Porting Stunt Car Racer to the NES
I recently released the NES port of Stunt Car Racer. The release contains three cartridge images, one for each major video standard: NTSC, PAL, and Dendy. If you don’t have access to real NES hardware, or you only have a Famiclone that’s not 100% compatible with the original, then I recommend using the latest version of the Mesen emulator. The game uses the MMC3 mapper with 8K WRAM and 16K CHR-RAM. Here’s what it looks like in action:
Motivation
One day I ran into an article in Retro Gamer Magazine on Stunt Car Racer, which contained an interesting claim: Pete Cooke, who was responsible for the Z80 ports of the game, had adapted the game to the NES, but this version was never released. As far as I know, the NES only ever got one real 3D game: Elite, and only in the PAL region. There was also a prototype for Chuck Yeager’s Fighter Combat, which could render filled polygons on the fly on an NTSC console.
Adding a new game to this very short list obviously sounded like an interesting challenge, and a great opportunity for me to get familiar with a new system that’s radically different from the home computers I had worked with at that point. I’m quite happy with the end result, and I’m really curious how it would compare to Pete Cooke’s unreleased version.
Radically Different
The game was originally developed for the C64, and all my ports are based on that release. Up until this point, I never had to adapt to a completely different architecture. Sure, the Commodore Plus/4 or the Apple II required me to rewrite parts of the renderer due to differences in the available graphics modes, but the basic idea was always the same: the CPU and the video system share the RAM, so I can simply render the next frame into a back buffer and switch to it instantly by writing to an I/O register.
Basic Architecture
In contrast to the above, the NES has a more distributed architecture, where the PPU (Picture Processing Unit, i.e. the video chip) has its own memory and runs on a separate clock from the CPU. If we want to change anything on the screen, we have to work out what we need to write to the video memory to make that happen, then we need to send the relevant data to the PPU byte by byte.

The big catch is that we can only send data when the PPU is not generating the display, i.e. either when the screen is turned off completely, or during the vertical blank period. This leaves us with a very limited bandwidth on NTSC machines, because the blanking period is less than 8% of the total frame time. On PAL systems the situation is much more relaxed with over 22% of the frame being available for this purpose. This is the reason why Elite was PAL-only: it would have taken too long to transfer each rendered frame with the NTSC’s bottleneck.
There’s an upside to the separation of CPU and video memory: the two systems can work independently, without having to wait for each other. Because of this, the CPU in the NES can consistently operate at a higher speed compared to most 6502-based home computers, which had the CPU and the video chip work in lockstep, the latter stealing cycles when necessary to fetch enough data. In short, the NES can run more game logic per frame, but it can only modify a small part of the screen at a time, at least without resorting to various tricks. Foreshadowing!
Extensibility
Unlike home computers of the era, the NES is not really a fixed hardware platform in practice. A computer game is a piece of software that’s expected to run in a fairly well-defined environment, in some cases including logic to detect a limited number of hardware variations (e.g. the size of RAM available). Conversely, a game cartridge can pack its own hardware extension that takes over the system bus and adds extra capabilities the original system wouldn’t provide out of the box.
In the case of the NES, the extra hardware in the cartridge outside the memory modules is referred to as a “mapper”, because traditionally its only function was to enable bigger games via some bank switching mechanism. The MMC3 mapper I chose for this port is a popular standard that also adds a scanline counter triggered interrupt, for instance. When relying only on the console’s own hardware, the CPU has absolutely no way of knowing which part of the screen the PPU is drawing at the moment – apart from carefully counting cycles from the start of the vertical blank, the only built-in synchronisation point –, which sounds very strange to a C64 programmer who can get this information directly from the video hardware registers. Another elementary functionality the base hardware doesn’t offer but some mappers do is a simple cycle-counting timer.
Expecting the Unexpected
Having the CPU work in sync with the video chip opens up the ability to push limits in ways that are simply not possible on an architecture like the NES. All the popular 8-bit home computers make it possible to perform cycle accurate control of the video system – some provide direct support for syncing the CPU to specific parts of the screen being drawn, while others require various hacks to achieve the same, but it’s generally doable. When one can poke the video chip in a deterministic way, even hardware bugs can be exploited in useful ways, like sprite crunching on the C64’s VIC-II.
The NES PPU also happens to be very sensitive to unexpected usage patterns. This wouldn’t necessarily be a big problem if it was possible to reliably synchronise the CPU to exact dot positions, but in its current form it’s difficult (really outright impossible in many cases) to work around. Also, the general design of the PPU works against most raster-based tricks. For instance, something as trivial as changing a colour register mid-frame on the C64 becomes a nightmare on the NES.
I also got the impression that breaking the standard limits of the platform is not as much of an expectation on the NES as on the C64, so its games have a more uniform look from a technical standpoint. My guess is that this is mostly caused by the fact that consoles were largely closed commercial platforms before the 2000s, while computers were the playground of bedroom coders and later the demoscene due to their openness, leading to two completely different cultures of creative expression. Still, I couldn’t resist my Commodore background and wanted to bring some of that spirit into this project just to make it extra special. And it’s the kind of suffering I enjoy. ;)
Fighting the Grid
Both the C64 and the NES have tile-based video systems that use 8×8-pixel tiles as elementary building blocks. The C64 has two kinds of video modes: text and bitmap. Text modes are similar to the NES PPU’s only video mode, i.e. they are basically tilemaps referring to a 256-entry tileset. Bitmap modes skip the indirection and allow a unique pattern in every tile, but this comes at the price of higher memory usage.
Due to the high resolution afforded by the NES I decided to use the art from the Amiga version of the game as the starting point. When trying to adapt an arbitrary bitmap to the platform, the biggest practical limitation is the size of the attribute blocks: we are forced to use just 4 colours within each 16×16-pixel region, and we can only have 4 colour combinations across the whole screen, which have to share a global background colour.
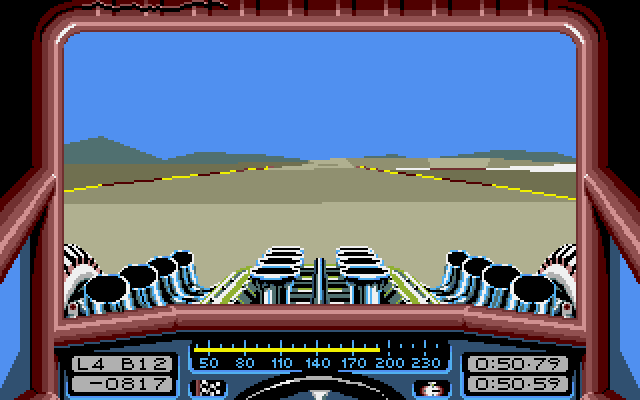
My approach was simple. I decided to take a vertical slice from the middle of the screen, which left me with 256×200 pixels. On the Amiga there’s no need to worry about any kind of attribute grid, so I had to move some elements around a little bit to separate areas with different colours. The biggest change is that I made the red bar in the middle slightly thicker, but otherwise the final result is quite faithful to the original:
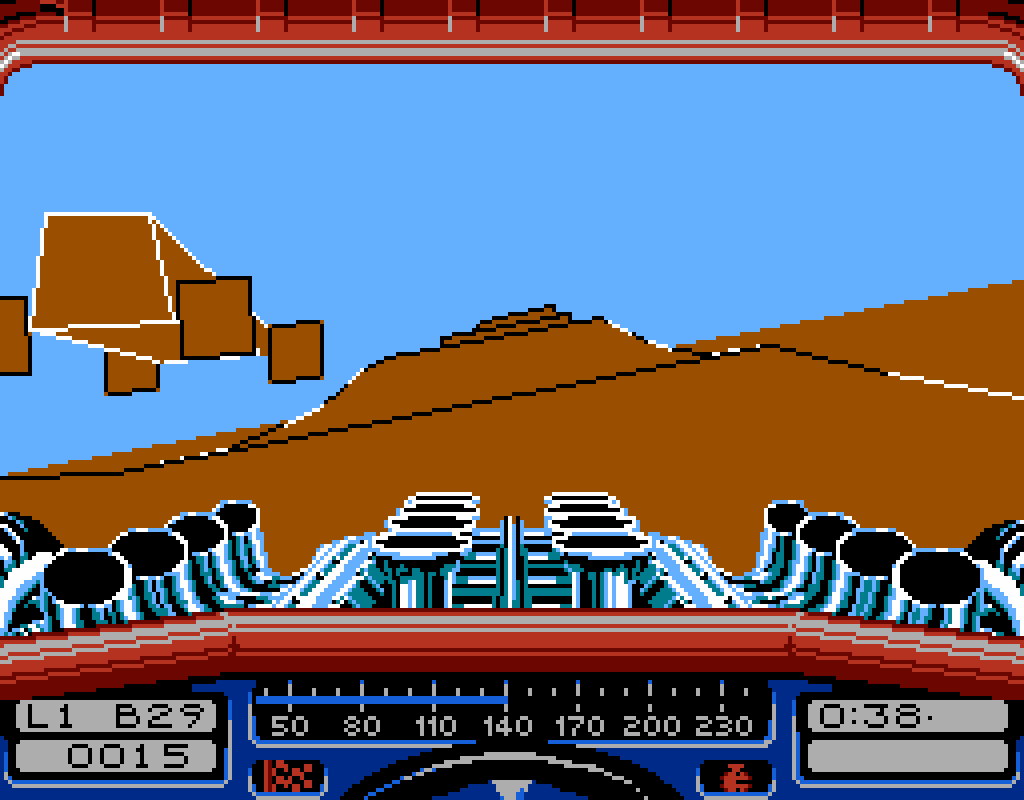 Stunt Car Racer gameplay on the NES. |
 The palette used during gameplay: 1. Viewport 2. Car front 3. Roll bar 4. Dashboard |
Let’s look at the same image with the tile and attribute grid highlighted:
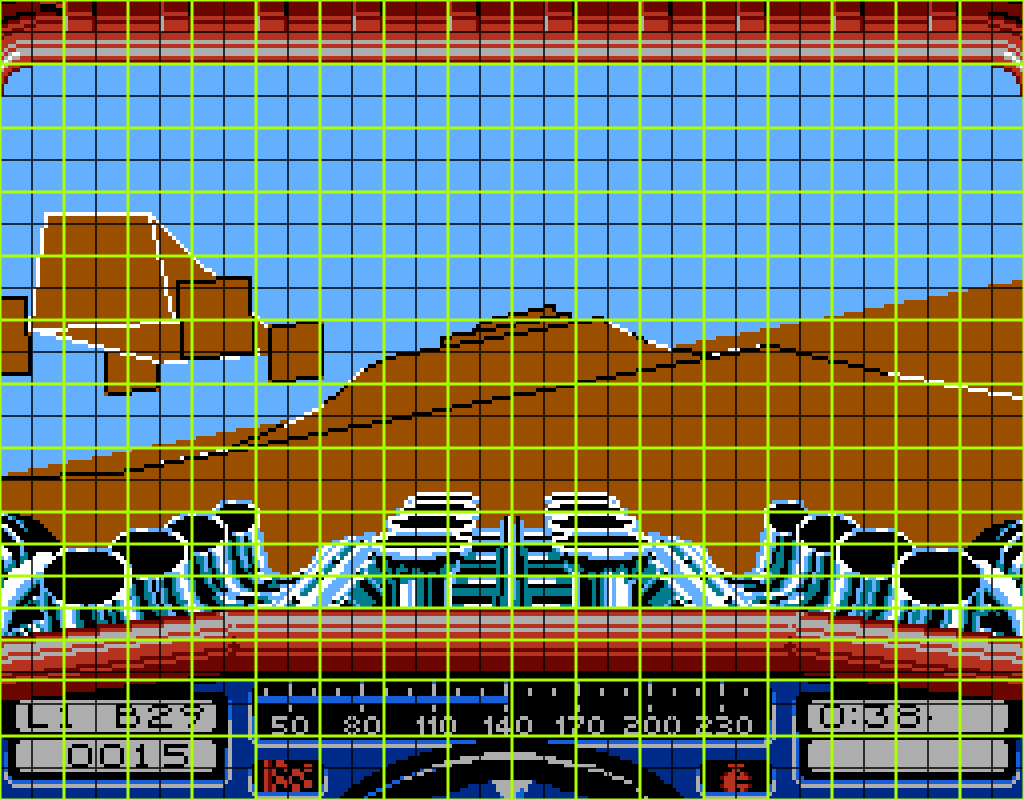
Things are fairly straightforward in the top half, but the attribute grid gets suspiciously dense in the busiest middle part of the screen. Also, if you look closely, you might notice that the attribute boundary doesn’t even line up with the tile grid at the top of the dashboard! What’s going on here?
It turns out that there’s one thing that we can actually change mid-frame and get reliable results: the scroll position. All I have to do is set up raster interrupts at a few key scanlines and adjust the Y position of the view. The magic trick is revealed by looking at the actual tilemap as the PPU sees it:
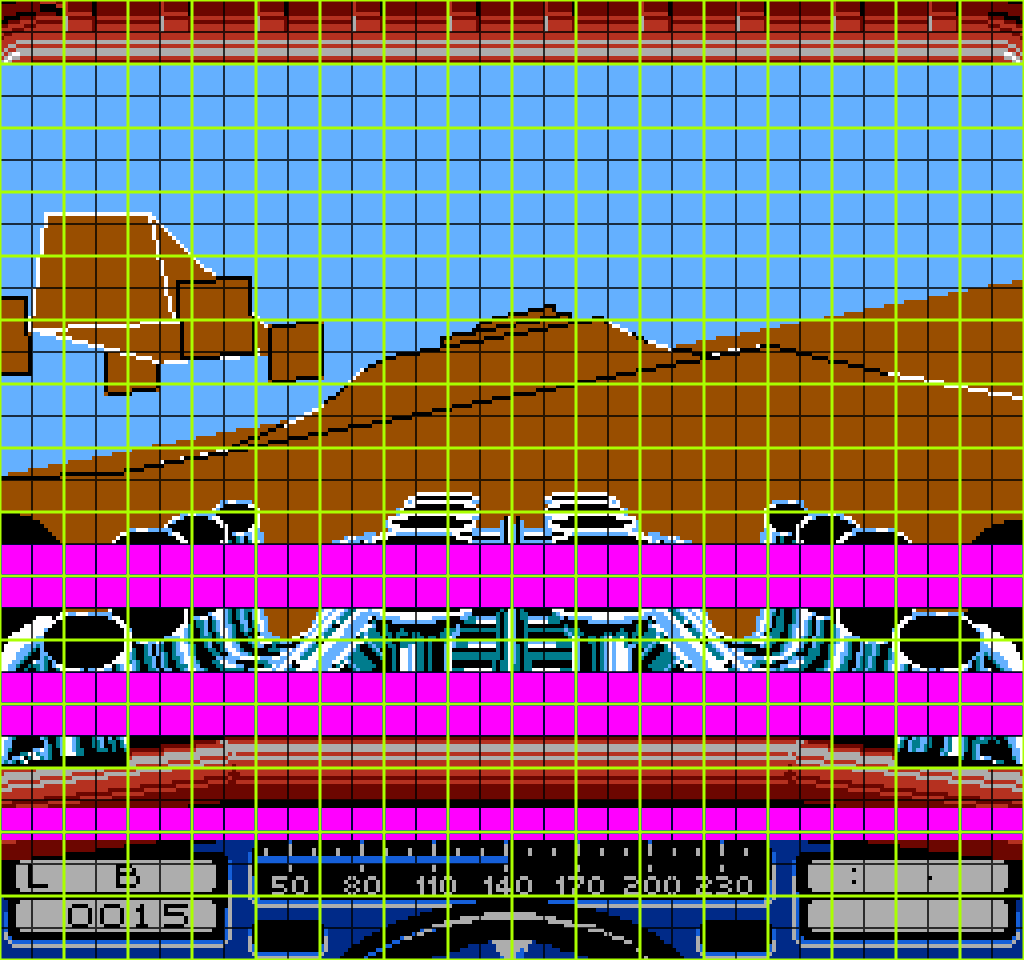
In the above illustration I used a pure magenta shade to mark the extra padding that’s skipped over when adjusting the Y scroll. In reality, these parts are filled with the black background colour. With this tweak, every attribute block is limited to a valid palette.
The padding is not the only thing that changed; some elements are completely missing from the tilemap. These are filled in using hardware sprites:
- the top curved corners of the viewport,
- the animated grooves on the wheels (which always have the car’s colours),
- the diagonal transition between the car’s front and the roll bar,
- all numbers and indicators on the dashboard except for the distance to the opponent and some punctuation between the timer’s digits.
Just as the background layer, the sprites also have their limitations. The NES can show 64 freely positioned sprites of size 8×8 – or 8×16, but I’m not using that capability –, each with three colours picked from a set of 4 palettes (distinct from those of the background). Crucially, on any given scanline only 8 sprites will be displayed. This limit is reached with the diagonal cover-ups, but never broken thanks to the way the gaps are grouped.
There’s a bit more going on here, because what we’re looking at is actually two tilesets. The 3D viewport is handled separately from the rest of the screen. In order to make that work, there are additional moments where we switch between tilesets. Since this is done through the mapper, it doesn’t interfere with the PPU, and we only need to make sure it happens during horizontal blanking to avoid visual artifacts. More on this later!
The Joys of Banking
The game can be divided into two main parts: pure logic and presentation. In theory, the former could be taken as is when porting to a new platform with the same CPU, and only the latter needs to be rewritten for the target hardware. In practice, there are some extra hurdles to deal with.
On the C64, Stunt Car Racer takes up all the available memory: 64K RAM. On the NES, the code from the cartridge is limited to a 32K address range that provides a few windows into a bigger ROM via bank switching. There are two things the original code can do that needs to be worked around on the NES:
- Any part of the code can directly call any other part.
- Code can modify itself on the fly.
Given enough RAM, the second one is easier to solve: just copy the self-modifying portions of the code to RAM during initialisation, and call those copies instead of the original. However, the NES is woefully short on RAM. There’s only 2K (!) of built-in RAM visible to the CPU, and the MMC3 mapper can provide an extra 8K block of work RAM.
While 10K might sound like a lot, we also need that space for other purposes. Unfortunately, one of the instances of self-modification is in the line drawing routines, and they are too big to be dealt with this way. After some consideration I decided it’s easier to make several copies in the ROM to cover its different use cases. More on that in the rendering section below.
In the end, I ended up reserving just three pages, i.e. 768 bytes for self-modifying code that couldn’t be easily adapted to work in ROM. This contains three routines, all part of the logic to project coordinates into screen space.
Regarding the problem of direct calls, there’s no easy solution. We have to look at the call graph of the program, chase dependencies and group them such that they can be placed on the same ROM bank. The MMC3 maps the PRG-ROM into CPU’s address space as four 8K banks, two of which are fixed and two can be switched freely. After a lot of juggling I ended up organising the cartridge the following way:
| Bank | Contents |
|---|---|
| 0 | Gameplay screen |
| 1 | Menu screens |
| 2-3 | Title screen |
| 4-5 | Cutscene image: race won |
| 6-7 | Cutscene image: race lost |
| 8-9 | Cutscene image: promoted to next division |
| 10-11 | Cutscene image: wrecked car |
| 12-13 | Cutscene image: excellent driving (final victory) |
| 14-19 | Unused (48K) |
| 20-23 | Unrolled loops to upload frame data to the PPU |
| 24 | Clearing the framebuffer |
| 25-26 | Rendering: line drawing, sky filling, spark particles |
| 27 | Arctangent look-up table used for projection |
| 28-29 | Game logic: main loop, physics, opponent logic, projecting geometry |
| 30-31 | Core (always mapped): reset, interrupt handlers, track data, common routines |
Whenever there’s a need to call a routine across banks, it’s handled via a small dispatcher in the core. For instance, the rendering functions are called from the game logic in this manner. The only exception is the arctangent routine, which is self-modifying and therefore lives in RAM.
Let’s Go 3D Already!
After going through the above process and getting the code to run on the NES, I really wanted to see the game in action. Also, I couldn’t be sure it was working properly until I got some kind of visualisation running. This is the point where I had a nice shortcut: replace each line with a sprite at its midpoint and just stop when we get to 64. Some back and forth later I could finally see the Little Ramp in its not entirely full glory:
The above version was clearly missing a lot of elements: no dashboard display, no boost flames, the wheels are not fully drawn. Also, the colour palette is different from the final one due to some reasons we’ll get to in a moment.
Emulating a Framebuffer
Before we can draw lines, we have to be able to set individual pixels. My next task was to set up a basic rendering system so the same dots would be drawn into the background.
First I had to decide how to represent the framebuffer. Theoretically it would be possible to create a freely addressable bitmap by filling the grid with unique tiles. The viewport takes up 32×16 tiles, i.e. we’d need to perform a bank switch halfway to be able to display up to 512 different tiles. There are 27 tiles with static contents, so we’d need to update 485 tiles for every frame. There are two big problems with this approach:
- When we’re done preparing a frame, we need to push all the data to the PPU before it can be displayed. The fastest way to do this is with a completely unrolled loop, which still requires 8 clock cycles per byte in the general case. Each tile is 16 bytes, i.e. we need 128 cycles to upload just one tile, which is more than the time needed to scan out a whole line. We’d need to spend 62080 cycles to upload a whole frame, which takes over 27 blanking periods on an NTSC console, i.e. nearly half a second. Even if the blanking period was 3-4 times longer it would still be too slow.
- More importantly, we’d need 7760 bytes of RAM to be able to hold the tiles while rendering. There’s simply not enough memory left to actually run the game. We couldn’t even fit the little self-modifying code we need at minimum.
The only way forward is to use a single set of up to 256 tiles to hold the frame. Since most of the frame is typically blank, this should be feasible, we just need to allocate tiles on demand while drawing. This not only eases the memory pressure, but also allows us to clear the screen faster, since we just need to reset the dynamic parts of nametable (the NES term for the tilemap). As an added bonus, we can introduce static tiles for some more common cases, like tiles completely covered by the sky or the picture of the chain used to lift the car on the track, which allows us to draw these elements much faster than before. In the final setup the tiles are allocated the following way:
| Tile Index | Contents |
|---|---|
| 0 | Full ground |
| 1-63 | Boundary between the car’s front and the 3D view |
| 64-224 | Free pool to allocate from during drawing |
| 225-250 | Static parts of the car |
| 251-254 | Chain pieces in front of full ground and sky backgrounds |
| 255 | Full sky |
Since tiles 1-224 are dynamic, we need to allocate RAM for them, a total of 3584 bytes (which happens to be exactly 14 pages). We also need to reserve space for two nametables for the viewport: one for the previously completed frame and one for the current one we’re working on. Since this is just for the viewport, this takes 512 bytes for each, exactly 1K in total.
But wait, you might say, a double buffering system would need to hold two framebuffers simultaneously! Indeed, but then we’d be out of memory again. I had to come up with a different solution to get around that problem.
Scheduling the Tile Dance
Each iteration of the game loop consists of three phases:
- Simulate the game.
- Render the viewport.
- Upload the image data to the PPU.
The last step needs to happen during the vertical blanking period, which means that it has to execute within an interrupt handler. Effectively steps 1 and 2 take place on the main thread, and step 3 runs as a background process while the main thread continues with step 1 for the next iteration.
It takes several frames to upload the all the tiles making up the image. However, after we are done with a batch, we are free to use those tiles for rendering the subsequent image. Assuming it takes four frames to deal with all the tiles, the work can be scheduled in the following way:

A box labelled Un means the nth frame of the upload process. On the other hand, a box marked as Rn refers to a part of the rendering process that needs to draw on at least one tile uploaded by Un.
The above diagram shows a scenario where iteration N requires so many tiles to render that it has to use the full budget. However, the next iteration is much simpler, and can fit in a number of tiles that can be uploaded within two frames’ worth of blanking periods. At this point, iteration N+1 still needs to wait until the previous image is fully uploaded to the PPU before it can jump to the simulation step of iteration N+2 and trigger its own upload phase.
In practice the rendering process is almost never blocked by the previous iteration’s upload process. The simulation step takes a while to complete, and I realised early on that I can also run part of the rendering routine before there’s a need to draw any tile – projecting coordinates into screen space takes a bit of time. If I defer the screen clearing step to the first moment I need to actually draw something, usually the first two frames of the upload process are already done at that point and there are enough tiles available to get started.
The Plot Thickens
The 3D world uses four colours: one for the ground, one for the sky, and two for the lines. In order to come up with a way to set pixels we need to look at how tiles are represented in memory.
On the C64, the game uses multicolour bitmap mode, which means that every tile is made up of 4×8 double-width pixels (so the tile is square shaped) and can be one of 4 colours. In memory, each tile takes 8 bytes, one per row:

The tile data is set up such that a screen can be cleared with all 1 bits, so every pixel is set to the colour of the ground. To plot other colours, we can perform a logical AND operation with various bitmasks. This is one of the places where self-modifying code is used: switching between black or white colour is done by changing the address of the look-up table to get the bitmask from when plotting lines.
The NES does things a bit differently. Each tile is 8×8 pixels from a set of 4 colours. We still have two bits per pixel, but now they come from two bitplanes: first 8 bytes containing bit 0 of each pixel, then 8 bytes containing bit 1. Consequently, in order to set a pixel to an arbitrary colour, we need to modify two bytes in memory.
If we were to follow the convention set by the C64 version, we could plot white lines more efficiently than black ones, since we could get away with changing only the second byte’s corresponding bit to 0. This is clearly undesirable, so I made the decision to represent the sky pixels with two zero bits instead:

With this change, the only difference between plotting a black or a white pixel is whether we’re masking out a bit on the first or the second bitplane, i.e. whether we apply an offset of 0 or 8 to the start of the bitplane we’re targeting. As a happy accident, this also means that there’s no need for self-modifying code to pick the colour, since the logic is identical in both cases.
Unfortunately, assigning the sky to the 00 combination had a serious consequence: this had to be the common background colour across all palettes, forcing me to use an ugly bluish tint across the whole picture. This colour scheme was still used for the first release of the game.
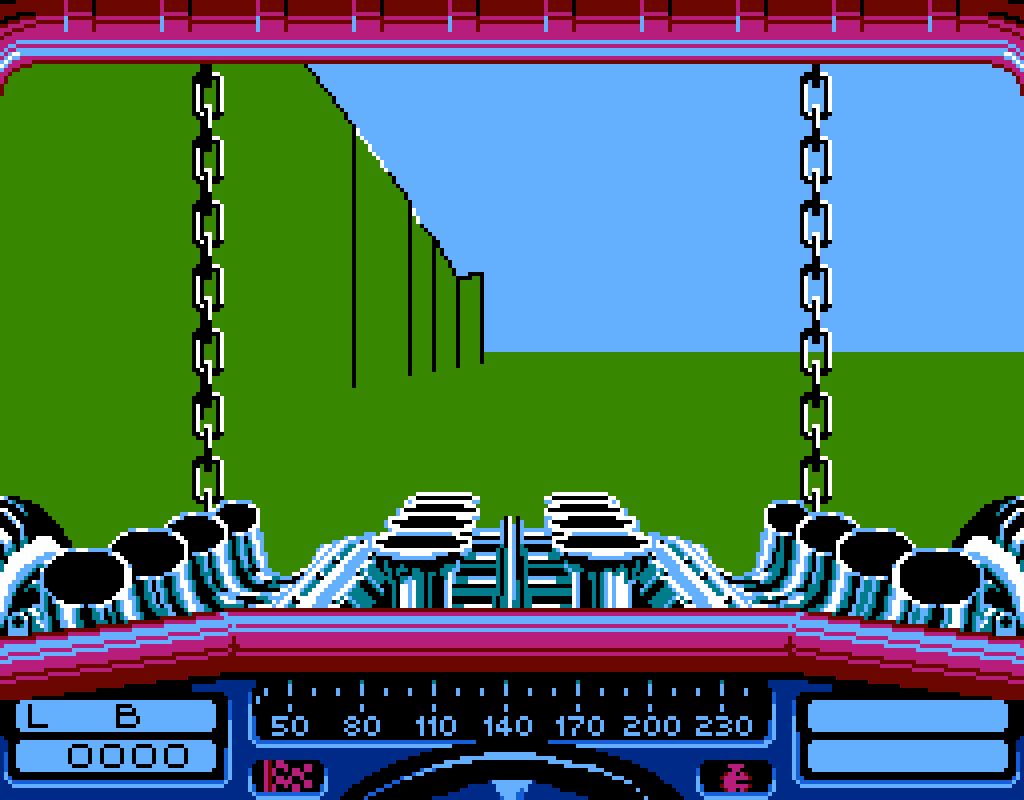
Having something other than black as the background colour also introduced some other technical difficulties, which I’ll elaborate a bit later. But mostly I just didn’t like the look, and wanted to find a solution.
The question is this: what bit patterns should we assign to the various colours such that black gets mapped to 00 and we can still plot all lines efficiently? Well, all we have to do is satisfy the following constraints:
- Black must be assigned 00.
- Ground colour must be 1 bit away from black.
- White must be 1 bit away from the ground colour.
Oddly enough, the answer ended up very similar to the one in my earlier Apple II port of the game:

In short, we plot black by setting a bit to 0 in bitplane 0, and white by setting a bit to 1 in bitplane 1, when starting with the ground colour. In general these would be different operations (AND for black and OR for white), which is bad news, because we’d need separate routines in the absence of self-modified code. Fortunately, there’s another way to formulate these operations: we need to flip a bit in both cases, so we can use XOR, and the only difference is the bitplane offset again. As a result, we can finally free the palette from its shackles:
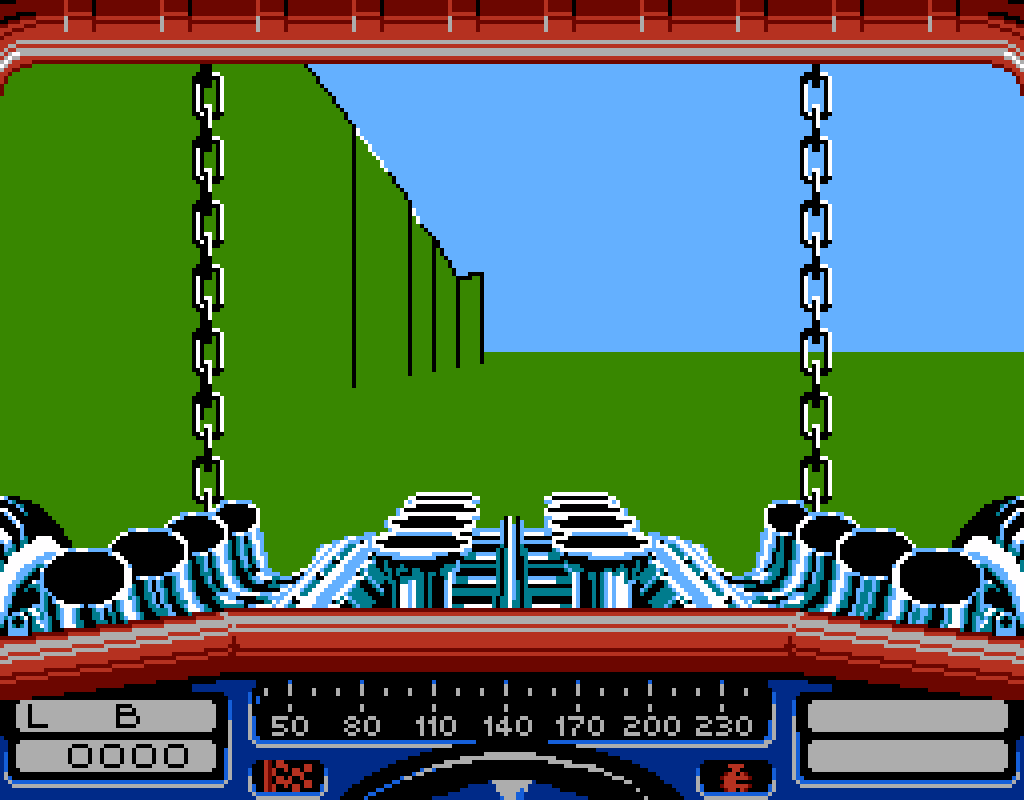
Switching to the XOR operation for drawing raises another question: what happens when two lines intersect? Previously we used idempotent operations for plotting, i.e. setting the same pixel twice wouldn’t change the outcome. XOR is different: applying it twice cancels out, and in fact this property was used a lot in the past to clear sprites in old games. Also, this was the basis of an extremely controversial and infamous patent back in the day.
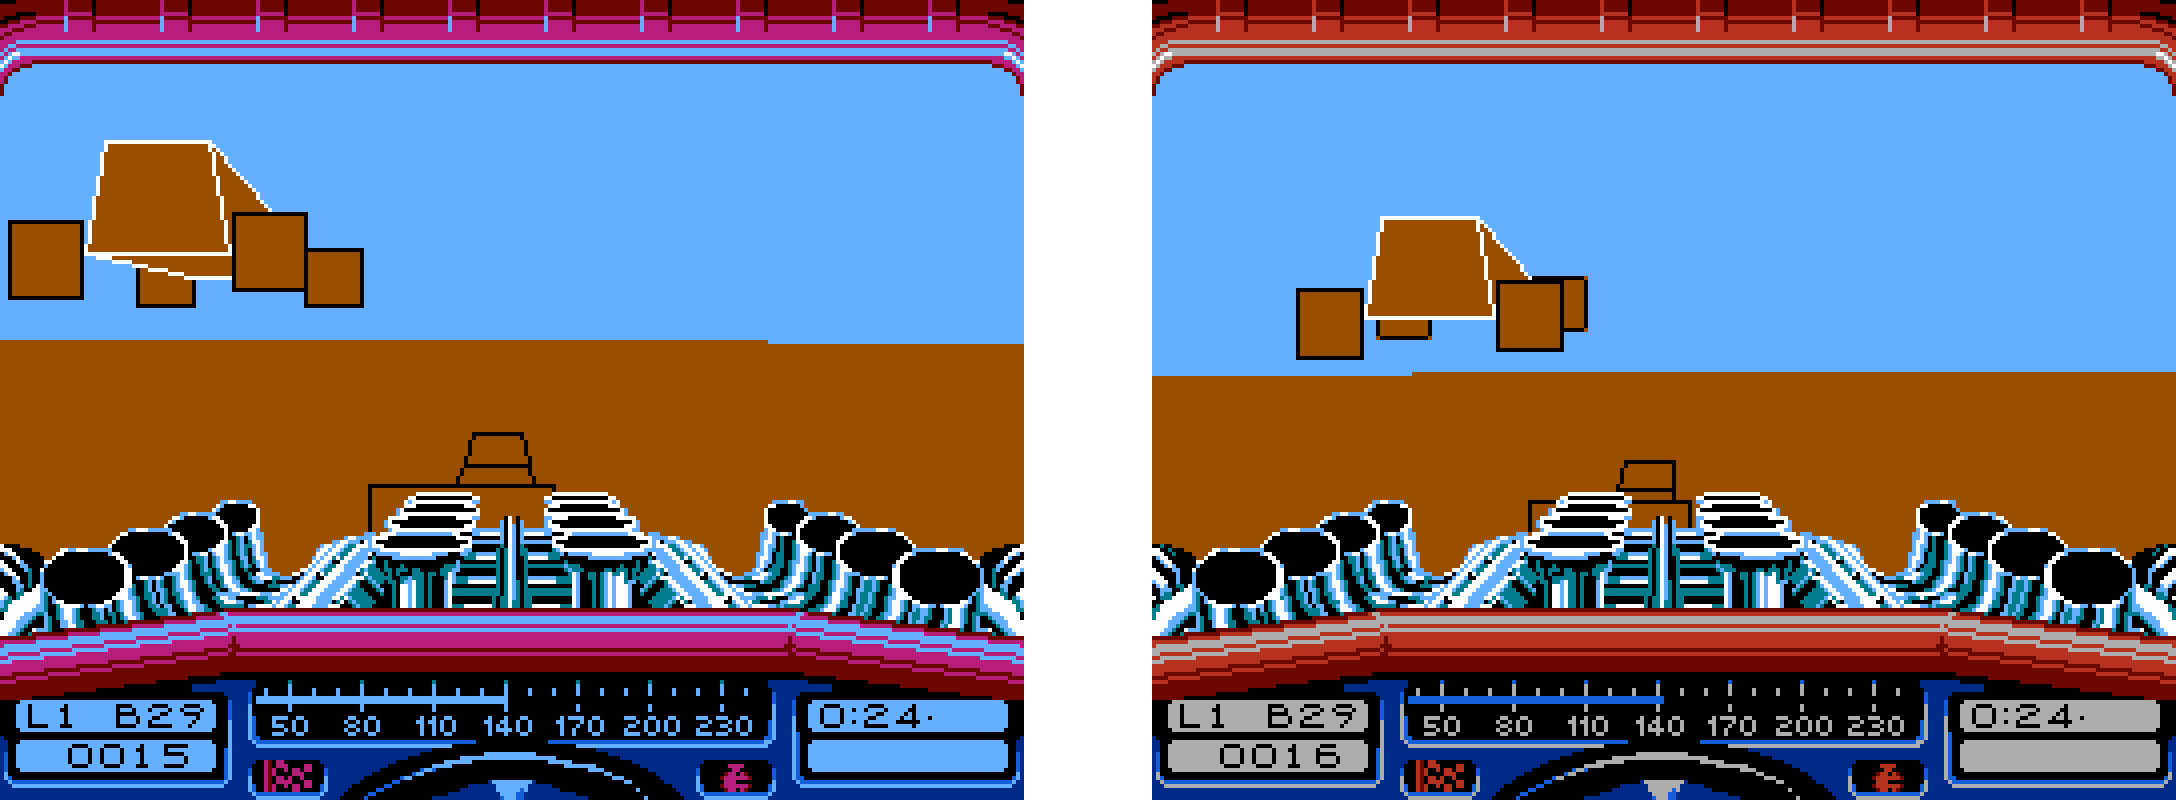
Fortunately, the way Stunt Car Racer’s renderer works ensures that no pixel is written to twice as a side-effect of implementing occlusion. At least in most cases. There’s one exception: the front wheels of opponents are drawn in a way that their corner pixels are touched twice. With the first method they ended up black as in the C64 original, while the final approach reverts them back to the ground colour, which gives them a slightly rounded look. I’m willing to call this another happy accident.
Putting It All Together
To close off this section, let’s see how a full picture is built byte by byte. In the animations below each frame corresponds to writing one byte of data: either pixel data or tile indices. When a tile index is changed, a green rectangle appears and fades away over the next 100 frames. Uninitialised pixel data is marked with magenta, and pixel data with only one bitplane initialised is marked with yellow.
You can toggle play/pause or just seek directly wherever you want in the timeline. If the seek bar is in focus, you can use the left and right keys on the keyboard to step by one frame (i.e. byte written) in either direction.
The first example is a classic chase moment where we’re right behind the opponent in the middle of the jump. It’s interesting to see how the sky is filled under the opponent:
The second example demonstrates how the crane’s chains are drawn using the prepared tiles and how they are composited with non-empty tiles:
Finally, here’s an example what happens when we run out of tiles before everything is rendered. Whatever is being drawn at the moment is interrupted as soon as a new tile is required to continue. This is quite rare, and usually only happens when the car falls off a high track at an oblique angle, in this case the Roller Coaster. Well, maybe not that rare!
It’s easy to see that whenever the rendering routine needs to allocate the first tile in an upload batch, the whole batch is initialised with the ground colour. This might look wasteful, but it is done with a heavily unrolled loop, and in the end it accounts for a tiny fraction of the time to build a whole image. Most time is spent drawing lines.
Into the Pipes
So far we’ve been talking about the dataflow in abstract terms, so let’s dive into some NES specifics!
The basic way the console operates is fairly straightforward: the PPU scans out frames in sequence, and at the end of each frame there’s a vertical blanking period during which the video hardware is inactive. It’s possible to set up a non-maskable interrupt that’s invoked when the blanking period starts. The programmers are expected to perform all the data transfers needed to update the contents of the screen within the handler of this interrupt, and this process needs to finish before the next frame starts.
In order to send data to the PPU, we need to specify the target address in the video RAM first, then we can send the data byte by byte. After each byte the address auto-increments either by 1 or 32 depending on a programmable flag, so writing contiguous ranges is more efficient. In terms of code it looks like this:
  lda #>SourceAddress // High byte of the address
  sta PPUADDR
  lda #<SourceAddress // Low byte of the address
  sta PPUADDR
  lda Value1
  sta PPUDATA
  lda Value2
  sta PPUDATA
  lda Value3
  sta PPUDATA
  ...
This is the interface to update tiles, tilemaps or the palette. Sprites are a different story, because they are updated via DMA:
  lda #$00
  sta OAMADDR
  lda #>SpriteDataAddress // The high byte of the address, i.e. the page
  sta OAMDMA
Object Attribute Memory (OAM), i.e. sprite data is 256-byte block, four bytes per sprite. While it can be updated partially, this is not recommended due to various hardware bugs. In practice, we set the target address to zero, so the data is written starting with the correct offset, then we issue a DMA request. We need to prepare all the sprite data on a page-aligned buffer in RAM, and as soon as we write the page number to OAMDMA, the CPU is suspended for 513 clock cycles while the data is being copied. This also needs to happen with the display off, and it needs to happen on every frame, so it takes a chunk out of the already limited time we have to push the tiles to the PPU.
Going Broadband
On NTSC consoles each frame consists of 261 scanlines. 240 of these make up the picture, and the remaining 21 are the vertical blanking period. The CPU is only notified when the first one of those is over, so we get 20 scanlines, or roughly 2273 cycles, to do all the updates. We immediately lose a quarter of those due to having to update the sprites on every frame. Since it takes 128 cycles to push the 16 bytes making up a tile, we can only update 13 of them if we leave some time for interrupt book-keeping. At this speed we could only aspire to reach 2-3 frames per second.
One thing the NES can do that the C64 cannot is to enable rendering for only a partial frame. The display enabled flag is latched on the C64 and only checked at one specific point during scanout, while on the NES it has an immediate effect. This enables a technique called forced blanking.
Typically, forced blanking means that our interrupt handler turns off rendering, does whatever work it needs to, then it turns rendering back on, and the PPU will start showing the screen at a lower vertical position corresponding to the extra time used. The catch is that in the absence of timer interrupts we have to keep track of the time by counting cycles manually, i.e. the interrupt handler must always use nearly the exact same amount of cycles before turning rendering back on, otherwise we’ll get an unstable, “jumpy” image.
In the case of Stunt Car Racer we have a 256×200-pixel screen, so we should be able to extend the blanking phase with 40 scanlines, effectively tripling its length. I opted to cut off both the top and the bottom of the display so the visible part is vertically centred.
Here’s an example frame from Mesen’s Event Viewer window, which shows when various events happen with respect to the PPU’s current scanout position:
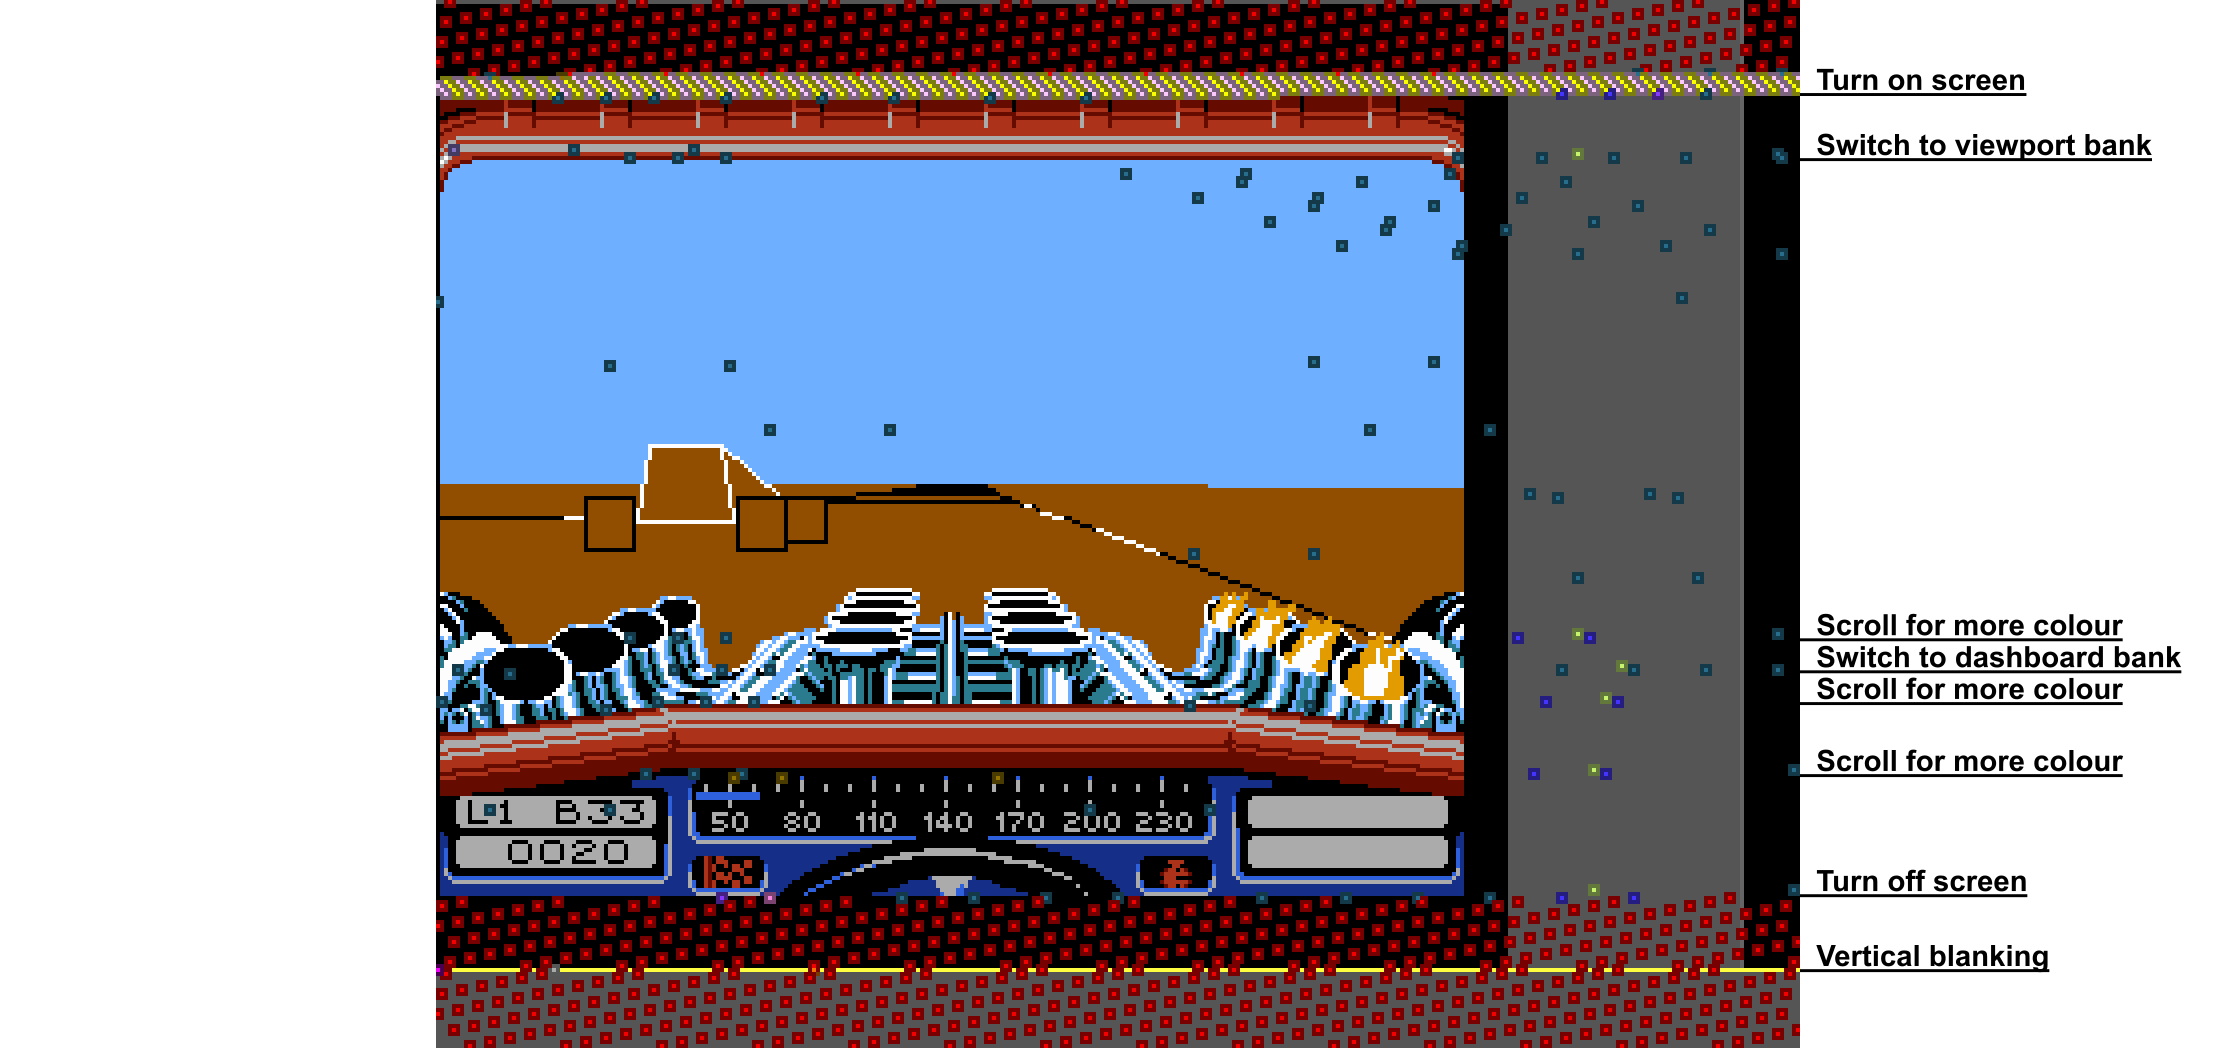
At this moment we’re in the middle of sending the next frame to the PPU. The red dots mark individual bytes being sent. The teal dots are commands sent to the mapper, mostly bank switches. These are used both for accessing more code and expanding the number of on-screen tiles beyond 256, so they happen all the time. The blue dots mark setting the data address on the PPU, which is used for two purposes: specify where data is sent from the CPU, and also to set the scroll position. The latter works because the PPU’s address register is used to fetch background data to show – which is one of the reasons why we cannot send data during active display.
Transfer Schedule
Our blanking period consists of two parts. The first part, which I call preblanking, is the phase between turning off the screen and getting the vertical blank interrupt. The second is the interrupt handler itself.
The increased bandwidth makes it possible to transfer a full image over six frames on NTSC. The workload is scheduled as follows:
| Frame | Preblanking | Blanking |
|---|---|---|
| 1 | Tile data | Tile data |
| 2 | Tile data | Tile data |
| 3 | Tile data | Tile data |
| 4 | Tile data | Tile data |
| 5 | Tile data | Tile data + padding |
| 6 | Wheel bottoms Distance to opponent Crack and holes |
Tilemap Speedometer bar Lap time punctuation |
The first 5 frames are spent pushing the 224 tiles (regardless of whether all of them are used). In the last one of those frames there’s some extra time left that needs to be padded out so the display starts at the correct position. To deal with these frames I decided to adopt an idea that’s commonly used on the C64: nested interrupts.
During active display I’m using the MMC3’s scanline counter interrupt to be able to perform the various raster splits. This means that the moment the screen is turned off we’re also within an interrupt handler. If we’re in a frame where we want to send tile data, this handler pushes a specific amount such that we use up all the time before the vertical blank interrupt is supposed to be triggered. At this point the code runs a few NOP instructions timed in such a way that the vertical blank starts exactly in the middle of that sequence. This has two advantages:
- On the 6502 if an interrupt is triggered, the current instruction needs to be completed before the handler can be invoked. Since NOPs are fast, jitter is minimised and we’re as well synchronised to the start of the real vertical blank as possible.
- As we never hand the reins back to the main thread between the interrupts, we don’t need to reprogram the mapper or set the PPU address again. We can just keep pushing bytes to the PPU assuming that it’s already set up correctly by the preblank handler. Effectively the two interrupt handlers are merged into one.
I suspect this nesting setup is one place where Famiclones and not so accurate emulators can break. If the timing is off by just a few cycles and the second interrupt happens at the wrong moment, it’s very easy for the CPU to get completely derailed. For instance, if the first interrupt is allowed to complete and return before the second one fires, it will not switch back to the code that was running beforehand and everything breaks.
The last frame is where the work is finalised. The tile data can be updated in the background, and we leave everything with an immediate visual effect to the last moment:
- Wheel bottoms: the parts of the wheels that spill into the dashboard bank; there’s no double buffering here, so we have to change these on the very frame where we switch the viewport to the next one as well
- Distance to opponent: the only number on the dashboard that’s displayed using tiles as opposed to sprites to avoid the 8-sprite limit
- Crack and holes: just like the bottom of the wheels, these are not double buffered and drawn into dashboard tiles
- Tilemap: the about 450 bytes describing the dynamically allocated tiles of the viewport are pushed last, as these aren’t double buffered either – note on the event view that we only change the tileset via banking, and we don’t scroll the view at all when the viewport starts
- Speedometer bar: done by updating just two bytes each in 16 tiles based on the current speed
- Lap time punctuation: the colons and periods in the lap times are using background tiles, while the digits are sprites
This last frame is also different in that the preblank interrupt actually finishes before the blanking interrupt starts. The work is divided between the two such that the preblank handler deals with elements that have conditional logic in them, i.e. they don’t run in a fixed amount of time. The second half is all fully deterministic, so we can count cycles and make sure that the next screen is drawn in the correct position.
For technical reasons the crack behaves slightly differently from the C64 original. On the C64, all damage from a collision is applied to the crack instantly; the bigger the collision, the longer the crack grows during that update cycle. In my NES port the crack can only affect a single tile at once, since we can’t update arbitrary amounts of data in one go. During this last frame we refresh only the tile that contains the end of the crack. If there’s more damage, the crack will keep going at a maximum of 8 pixels per physics update, which is very visible during big collisions. I kind of like the effect!
As for PAL and Dendy consoles, due to the higher amount of total scanlines per frame we have a lot more bandwidth, and the transfer can be completed faster. Here are the schedules:
| Frame | PAL preblanking | PAL blanking | Dendy preblanking | Dendy blanking |
|---|---|---|---|---|
| 1 | Tile data | Tile data | Tile data | Tile data |
| 2 | Tile data | Tile data | Tile data | Tile data |
| 3 | Tile data | – | Tile data + Last preblank | Last blank |
| 4 | Last preblank | Tile data + Last blank |
The terms last blank/preblank refer to the work we need to do on NTSC during frame 6. Both PAL and Dendy have 312 scanlines (i.e. 49 more than NTSC), the difference is that PAL inserts the extra scanlines into the vertical blank, while Dendy adds them before it. So PAL has roughly the same preblank period as NTSC, while Dendy has the same vertical blank as NTSC.
It’s easier to compare these differences visually. On the images below we can see the work done in each frame. The start of the work is at the bottom and the second half is at the top due to the fact that it spans a frame boundary.

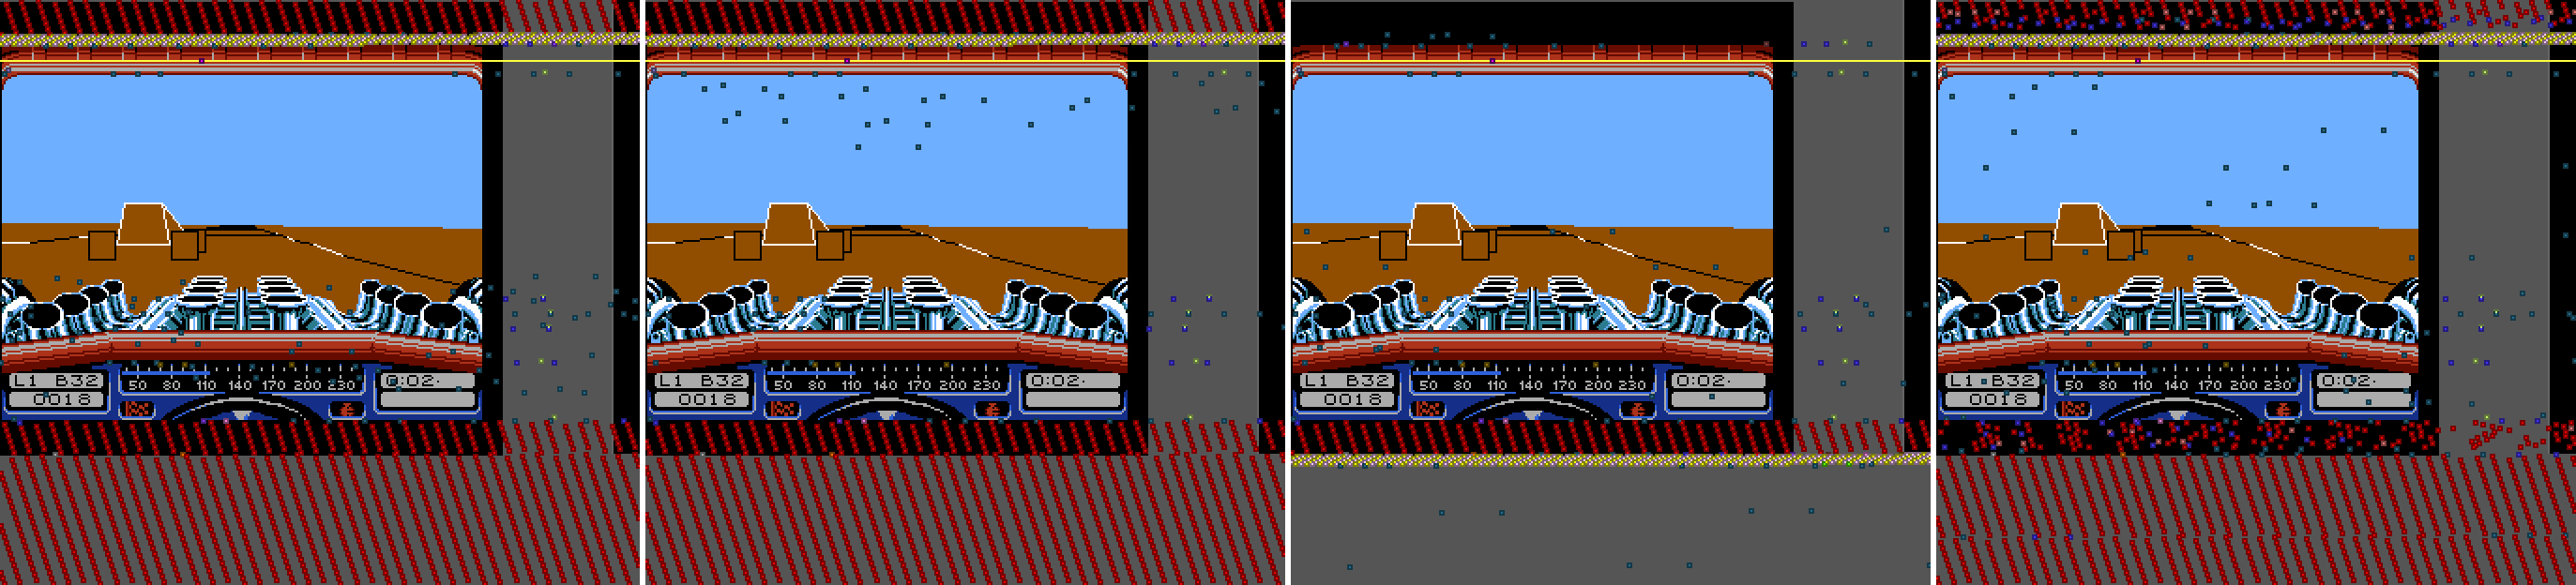
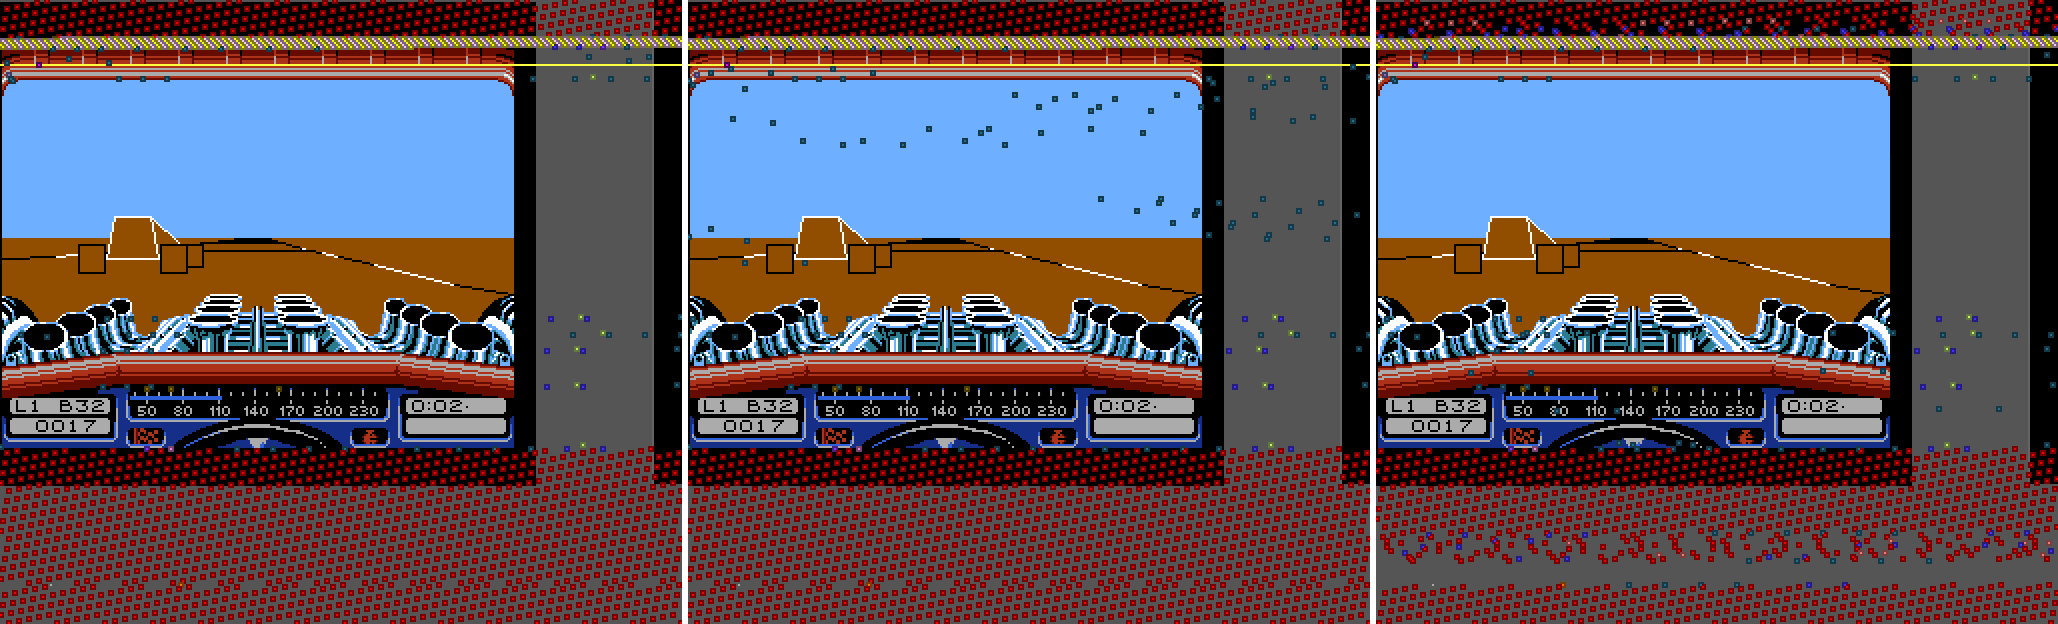
Both PAL and Dendy have the same amount of scanlines, but PAL machines get slightly less CPU clock cycles per scanline, so they need just a little more than three frames to move all the necessary data. However, the schedule allows the main thread to run in the blanking period of frame 3, so no time is wasted.
In the end, getting the update done in 6 frames is acceptable, since this is usually less than the time needed to fully render an image. In most cases there are 2-3 extra idle frames needed to finish an iteration of the game loop.
No Pain, No Gain
Before wrapping up, it’s still worth mentioning a few random gotchas I ran into during development.
No Atomicity
Let’s have a closer look at the bank switching function of the MMC3 mapper. The mapper has three address lines connected, giving 8 registers. Two are used for bank switching, four are involved in raster interrupts, and the rest in some other minor functions. In order to activate a certain bank to be visible within a CHR or PRG window, we need to perform two writes:
  lda #BankSelect
  sta MMC3_BANK_SELECT
  lda #Bank
  sta MMC3_BANK_DATA
The bank select value is a number between 0 and 7 specifying which bank we’re targeting: one of the 6 CHR banks (i.e. tile data being shown) or one of the 2 PRG banks. Its upper bits are used to tweak some specifics of the address mapping we can safely ignore for now. This is followed by the actual bank number. If we want to reconfigure the same bank repeatedly, then we don’t need to select it again.
The problem is that we need to frequently perform bank switching both on the main thread and the interrupt handlers. Since the above API is stateful, we have to make sure that an interrupt leaves the hardware in the same state it started in, no matter where the program counter was inside the above sequence.
Making this operation atomic by disabling interrupts is not an option because of two reasons. For one, the vertical blank interrupt is non-maskable, so there’s no way to prevent it from firing anyway. But even if it was possible, we wouldn’t want to do it, because the timing window available to perform the mid-screen adjustments without visual glitches is very narrow. The jitter of up to 6 clock cycles introduced by individual instructions is just within the acceptable limits.
Instead, the above logic must be extended by mirroring the values in memory so they can be safely restored when we’re targeting PRG banks:
  lda #$06 // Switch $8000-$9fff; use #$07 to switch $a000-$bfff
  sta CurrentBankSelect
  sta MMC3_BANK_SELECT
  lda #Bank
  sta CurrentPrgBank8000 // use CurrentPrgBankA000 when bank select is 7
  sta MMC3_BANK_DATA
Then at the end of an interrupt that relies on switching PRG banks we do the following:
  lda #$06
  sta MMC3_BANK_SELECT
  lda CurrentPrgBank8000
  sta MMC3_BANK_DATA
  lda #$07
  sta MMC3_BANK_SELECT
  lda CurrentPrgBankA000
  sta MMC3_BANK_DATA
  lda CurrentBankSelect
  sta MMC3_BANK_SELECT
If the interrupt is used to switch only CHR banks, then we only need the last two instructions.
Imagine how much simpler it would be if it had been possible to connect just one more address line to the mapper. With 16 distinct addresses, every bank slot could have had its dedicated register, and we wouldn’t have to track a bank select state. For instance, the almighty MMC5 mapper provides dedicated registers for every bankable section of memory, but it’s also a lot more expensive.
Errata
As I alluded above, the PPU can be difficult to work with when we want to do something unusual with it. Turning off the display prematurely is one of the things that needs to be handled with care.
In my setup, I turn the screen off just once, and refresh all sprites before turning it back on for the next frame. If rendering is turned off within the horizontal blanking period while sprites are being fetched, or when the first 64 pixels of a row are being drawn, the internal state of the sprite hardware is frozen in a way that would lead to some sprites getting corrupted in the next frame – even after the full update. Because, of this, I turn off the display in two steps: first I disable only background rendering at the end of the last row, then wait for the 64 pixels of the next row to pass before turning off sprite rendering as well, thereby avoiding the bug.
There’s another place in the game where I turn off the display temporarily in the middle of the frame: the title screen. The reason for this is that I’m peforming palette changes between the title on top and the image of the engine on the bottom.
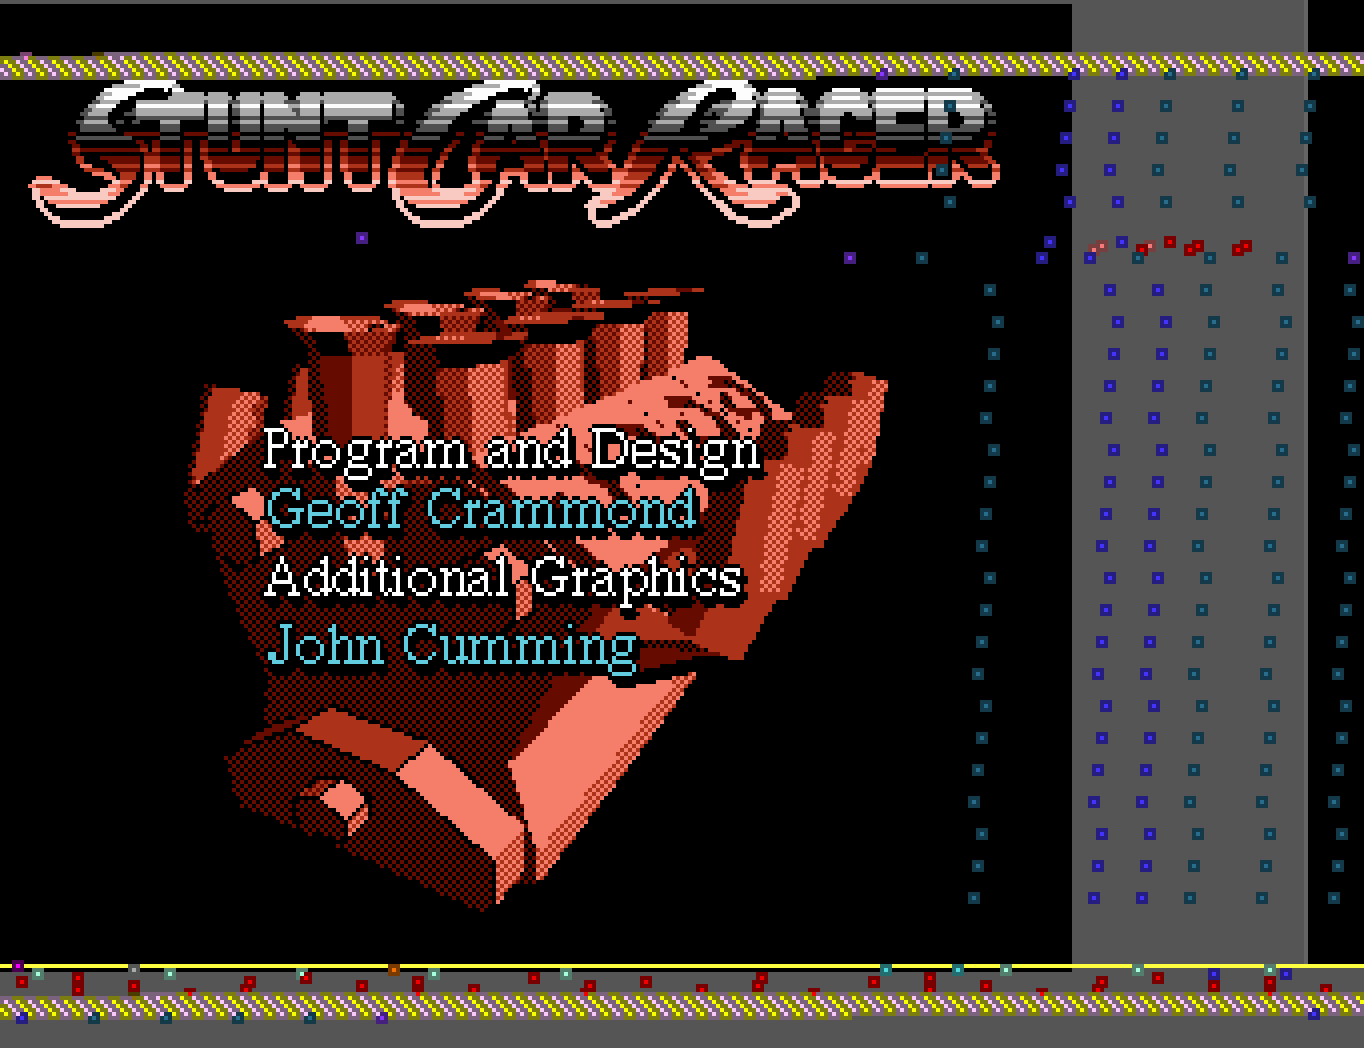
This screen uses scrolling after every 8 lines to make attribute blocks smaller, and it also uses sprites to fix parts of the image that couldn’t be represented using only background tiles due to the 4-colour limitation. Even slight changes to the timing around the palette swap can lead to the sprites flickering.
Another peculiarity of the PPU is that when the palette is being updated, if the raster beam happens to be in a visible area of the screen, the colour of the currently selected palette entry is emitted instead of the background colour when the display is off. Therefore, when we want to change a colour mid-frame, the palette has to be updated in the horizontal blanking period – those are the red dots in the event view between the title and the engine.
By the way, when still using the old approach where the sky was drawn as the background, I needed to perform two palette updates so the top and bottom of the screen would still be filled with black. The timing for those updates was very tight, and it would repeatedly lead to visible artifacts in one of the top corners, so I’m glad I could get rid of them altogether while also improving the looks of the game.
Timing Is Key
It should be clear by this point how crucial cycle-exact timing is to make this game work. One of the ways things can break comes from the inner workings of the 6502 CPU itself.
Notably, when we have a conditional branch, the time it takes depends not just on whether the condition holds, but also whether the jump needs to cross a page boundary, i.e. the high byte of the program counter needs to change. If that’s the case, then the instruction takes an extra cycle. This matters in a tight loop used for timing, like this:
  ldx #$30
Loop:
  dex
  bne Loop
Done:
If the address of Loop falls on a different page than the address of Done, then the loop takes an extra cycle for each iteration. Because of this, just moving around code without changing it otherwise can affect its timing. To prevent this from happening in critical areas, I’m using a feature of Kick Assembler, which has a directive to generate an error and fail the assembly. For instance, to guard the above loop, I could add the following statement afterwards:
.errorif (>Done) != (>Loop), "Page crossing violation at " + toHexString(Done)
Stepping on Toes
Whenever we have an active display, all data transfers to the PPU happen during interrupts. However, when switching between screens like gameplay, menu and cutscenes, we want to turn off the display completely so we can use the full frame time to update graphical data in bulk.
Recall that to send some data, first we need to set its address by writing the high and the low byte of the address into the same register in sequence. The PPU has an internal flag that keeps track of whether we’re writing the first or the second address byte. To make matters worse, this flag is also shared with the scroll position register, which consumes the two coordinates similarly. If this flag ever gets flipped the wrong way, all hell breaks loose, since every subsequent target address will have its two bytes swapped.
The only way to control this flag is to read the PPUSTATUS register that resets it as a side effect, while also clearing the signal that a vertical blank happened. Normally it’s a good idea to read the status at the start of the interrupt handler to establish a known state. On the other hand, when doing bulk updates between screens, one should either disable all the interrupts, or at least make sure not to read the status register at all, because it will break the ongoing data transfer if the interrupt happened to be triggered between writing the two address bytes. This is a 6-cycle window within a roughly 30000-cycle frame, i.e. it can lead to a sporadic bug that’s hard to reproduce but just frequent enough to be a real issue.
Closing Thoughts
I really enjoyed working on this project! Beforehand, I only had some vague idea about how the NES works, and my interests were firmly focused on the home computers of the era. Now I feel like I should get familiar with some of the other popular consoles of the day as well, and perhaps make something original for the NES with my fresh understanding. But only if it pushes some new limits, of course.
This is as good a moment as any to address the artificially intelligent elephant in the room. The sad reality of developing new titles for old hardware is that the potential audience is really tiny. Most people who play on retro gaming platforms are usually interested in spending time with the classics. There’s nothing wrong with that per se, but to me, this suggests that the only real motivation for making anything new for these machines is the pure joy of making it, and others actually engaging with the final product is an added bonus. It’s a fun puzzle to take a big idea and squeeze it into the hard limits developers of yesterday had to work with. This process requires a lot of creative decisions – both technical and artistic –, and one inevitably ends up learning a lot while chipping away at all the little details.
Automation has only one purpose: to increase productivity. Since the demand for new retro titles is already low, there’s really not much benefit to increasing their supply just for the sake of it. Generative AI is a strange new technology that can take over so much of the production process that it truly separates the creation from its creator, who turns into a commissioner. Even if we set aside all the negative externalities of this technology, I just don’t see the point of using it at all in such niche creative endeavours. Without the close connection to my work there would be no satisfaction and no sense of accomplishment, so what’s left?
That said, I do hope this game will find its audience, however little it might be. It’s good fun, I promise!