Porting Stunt Car Racer to the Apple II
After finishing work on my Commodore Plus/4 port of Stunt Car Racer, I realised that it would serve as a useful stepping stone for an Apple II version. I found the idea of a computer from 1977 running a game that was pushing limits in 1989 quite exciting, and I was also interested in learning about a platform I had no experience with whatsoever.
It took a few weeks of throwing away every non-essential feature and shuffling around what was left, but I just managed to squeeze the game into 48K RAM, which is the largest expansion the original Apple II would support (for a fine price of $2638 in 1977). You can download the game as a disk image from here. There are several emulators to choose from if you don’t happen to own vintage hardware to try it on; my personal pick is AppleWin, as it’s really easy to use and quite feature-rich. Here’s a quick video demonstration:
Getting to Grips with Apple II Graphics
The first thing I had to do was finally understand how Apple II graphics works. While I had a vague idea, I always found the various descriptions floating around confusing, and most of them generally didn’t help me answer the crucial question of what specific bytes to write into the memory to get specific colours.
The Dirty Secret Behind Every Colour
Before getting into how images are represented in memory, we need to look at video output first. The Apple II achieves colour via NTSC artifacting, which is too deep a rabbit hole to descend into if we just want to plot a few pixels. Fortunately, it’s possible to abstract away most of that complexity with a simple mental model.
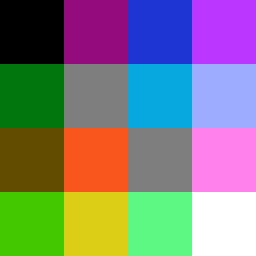
We can assume that all the computer does is generate a 560×192 pixel monochrome image where each column can only contribute a fixed colour to the final result according to the following pattern:

These four base colours can be used to generate the 15-colour Apple II palette by summing them in all the possible 16 combinations, two of which give us identical greys:
In reality, this “tinted monochrome” input image goes through some analogue filter to produce a picture on the TV screen. Luckily, we don’t have to fully understand this process when trying to create art for the system. If we apply a moving sum with a 4-pixel window (i.e. make sure to include every base colour’s contribution in every final pixel), we’ll get a good idea of what the final image should look like on the screen. This suggests that we have an effective colour resolution of 140 pixels, but at the same time we can paint finer detail on black-white boundaries.
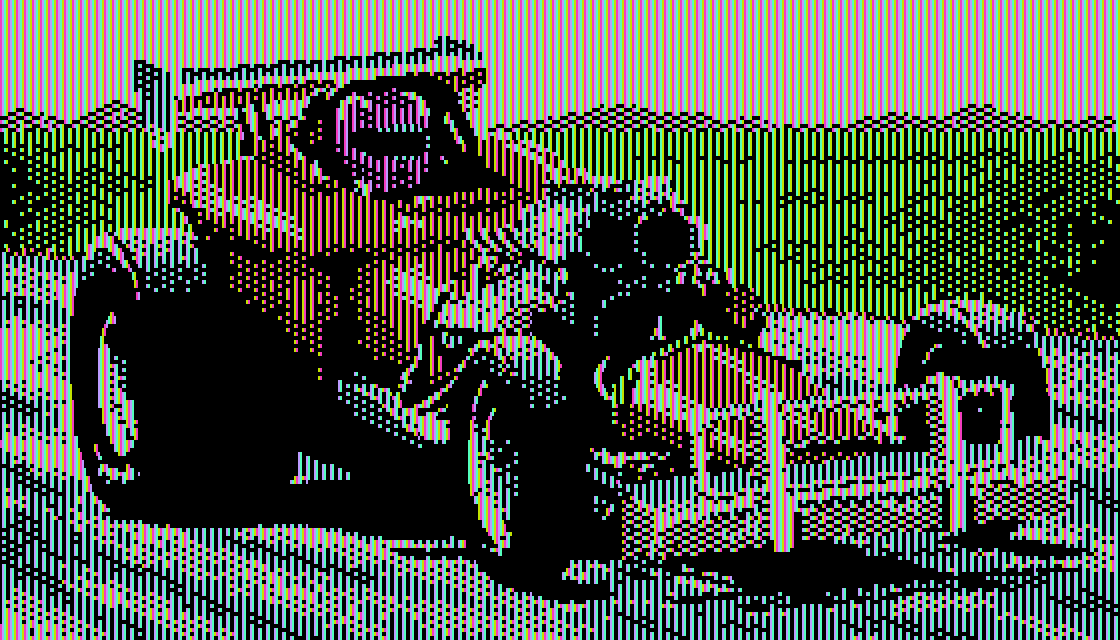
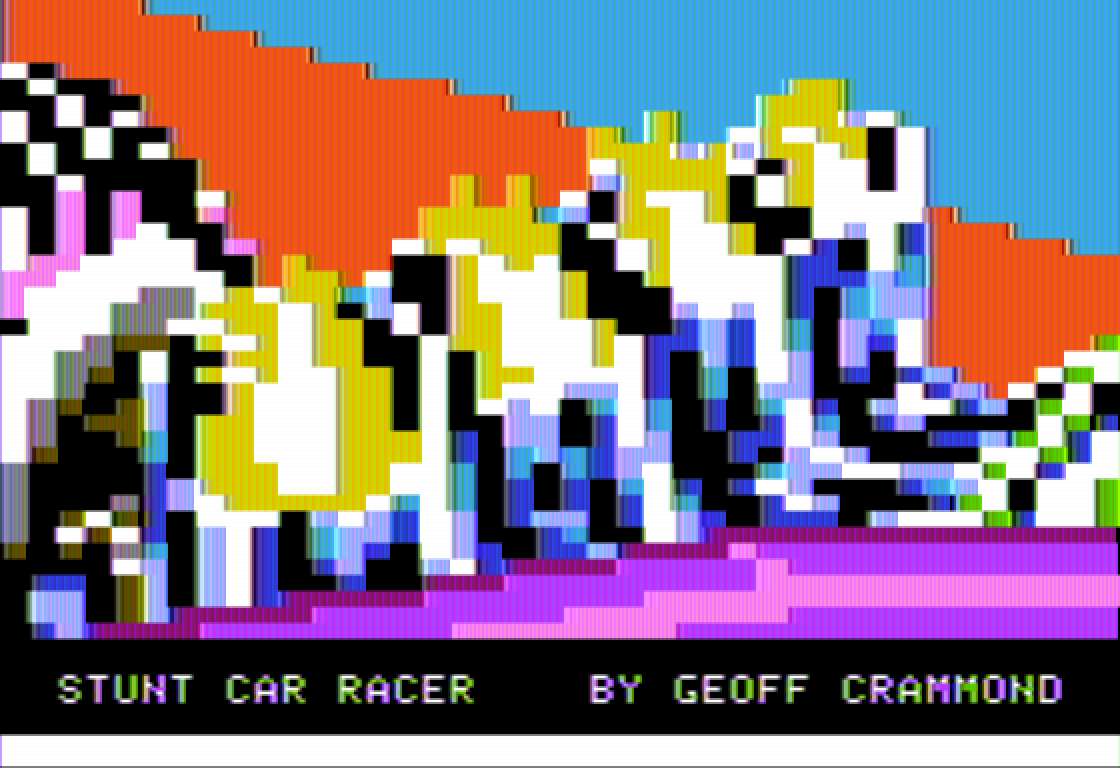
As an example, let’s look at the unfiltered title picture. I boosted the intensity of the colours so they’re easier to see. There’s some detail in the wheels that takes advantage of the full horizontal resolution, but it’s otherwise pretty clear how the patterns required to produce colours other than white determine the minimum feature size that can be represented visually.
If we apply a 4-wide moving sum, we get the following image:
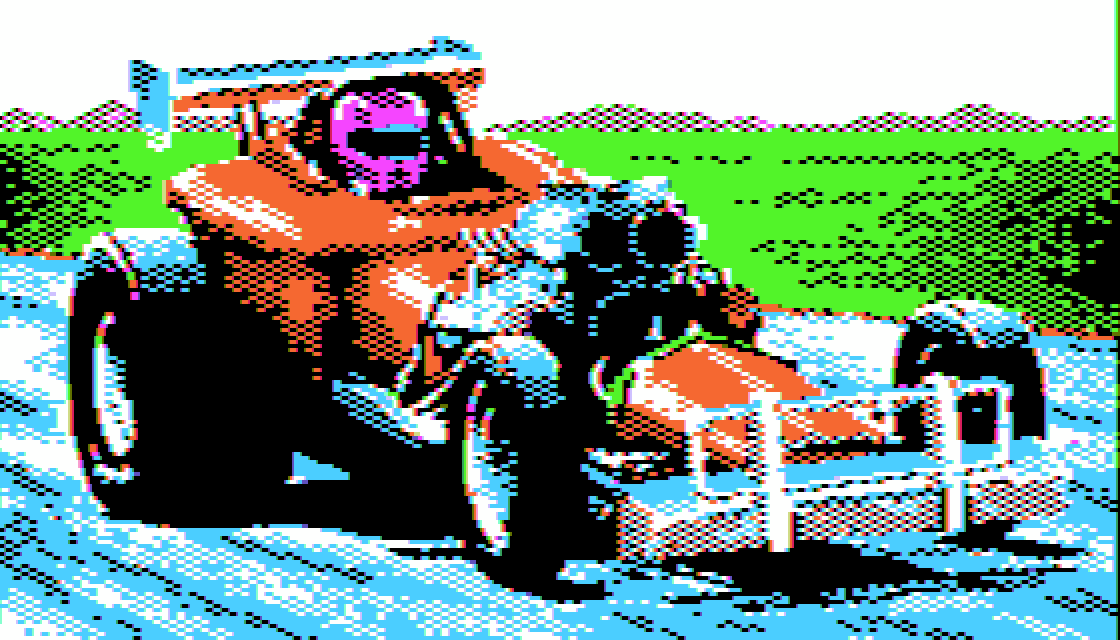
On a real display, the luminance component will likely have better contrast, but the chroma resolution is usually even lower than predicted by the model. At least the model allows us to understand what happens when two colours are placed next to each other and gives us a good idea of the fringing artifacts we might see as a result. For instance, it’s quite obvious that opposing colour pairs like purple-green or blue-orange are always separated by either a white or a black section depending on the horizontal position of the boundary.
Graphics Modes
So how can we generate these 560×192 pixel images?
The Apple II has three screen modes: text (40×24), low-res graphics (40×48) and high-res graphics (sort of 280×192, see below). The screen always displays 192 scanlines, and there’s the possibility of splitting graphics and text in a fixed manner: 160 scanlines of either low or high-res graphics followed by 4 rows (32 scanlines) of text on the bottom. Also, both graphics and text screens can be double-buffered. So far so good.
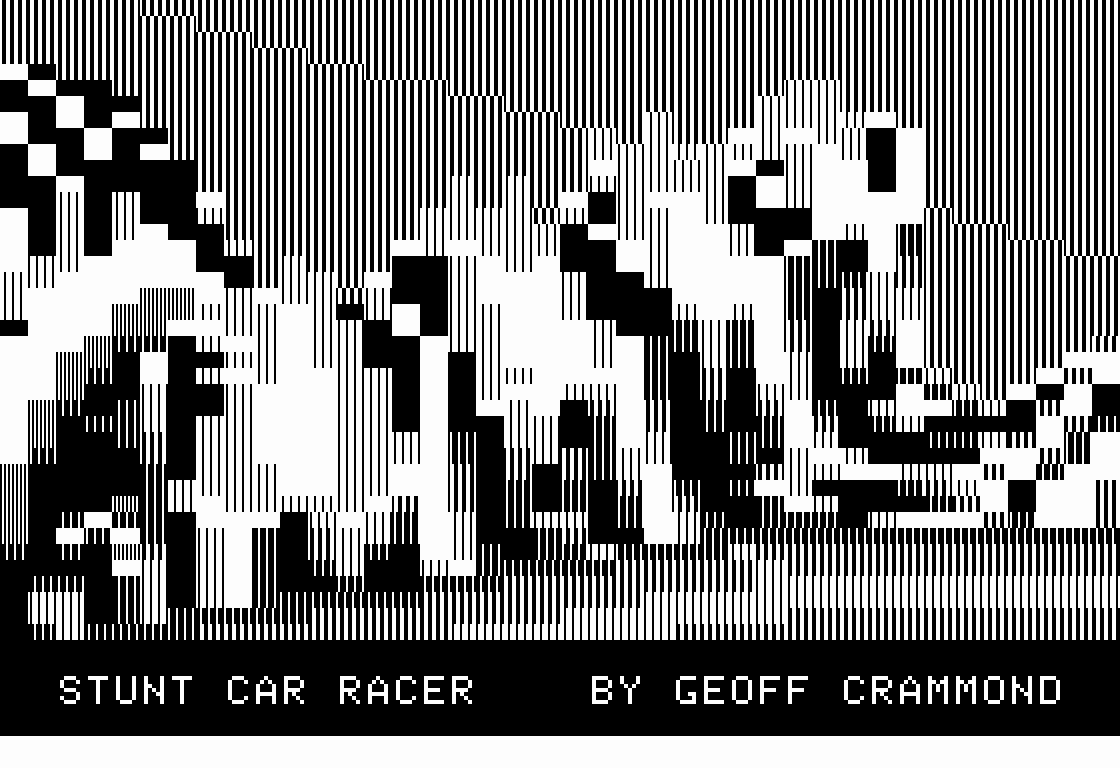
Low-res graphics is essentially a modified text mode: it is backed by the same memory region, just interprets character codes differently. Each character is replaced with two pixels on top of each other, both of which can be freely picked from one of the 16 colours. Each low-res pixel occupies 14×4 physical pixels. While the two greys are the same in isolation, they still differ in how they interact with the colours around them. The real difference between text and low-res graphics is the colour killer: when exclusive text mode is active, the colour component is removed, and we get a crisp 280×192 pixel black and white image made of 7×8 pixel characters.
The only low-res screen in my port is the splash screen seen while the game is loading from disk:
 |
 |
High-resolution graphics is built from 40 bytes of data per scanline, so we can’t control all the 560 pixels directly. Instead, each byte defines 14 output pixels: the lowest 7 bits each determine the value of two subsequent output pixels (left to right from lowest to highest bit), and the MSB is used to optionally offset the new values by a single pixel. This system allows us to output 6 of the 16 possible combinations of base colours as a repeating pattern, i.e. produce solid runs of single colours:
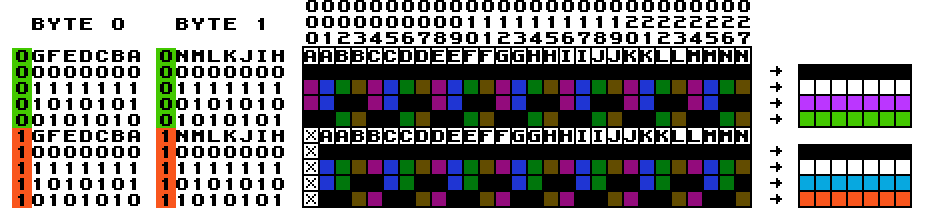
The pixels marked with X simply take the previous value from the left, which allows blue and orange runs to go uninterrupted just like purple and green ones. While the MSB doesn’t affect solid runs of black and white, it does allow us to have fine control over the position of black-white transitions. Otherwise it acts like a palette picker: a byte can produce either purple/green or blue/orange colours, but these cannot be mixed within the 14-pixel regions generated by individual bytes. Also, since the colour cycle is 4 pixels wide, but each byte is only responsible for 14 pixels in the output, we need to alternate between two specific values to get a solid run of any given colour, e.g. alternating 0x55 and 0x2a starting from the left edge of the screen generates a purple line, while starting the same pattern one byte later would result in a green line.
Adapting the 3D Renderer
I wrote about how 3D rendering is done in Stunt Car Racer in my article about the Commodore Plus/4 port, but I’ll recap the essentials here.
The C64 original renders the world into a 256×128 pixel window, but since it’s using multicolour mode, the effective resolution of the viewport is only 128×128 due to the horizontal stretching of pixels. Here’s a screenshot along with the underlying binary representation:
 |
 |
Multicolour bitmaps on the C64 work by assigning two bits to each pixel (hence the stretching), and each 8×8 block (4×8 multicolour pixels) can assign any colour to three of the four possible bit patterns. Only the 00 pattern – the background colour – has to be shared across the whole screen.
The game uses exactly four colours for the 3D scene, so it can use the same palette for all the viewport blocks. There’s one exception to this: when a block is fully covered by empty sky, the game changes the palette entry for that block (just one byte) instead of filling the bitmap with a sky pattern (8 bytes), which would be much slower.
| Colour | Pattern |
|---|---|
| Ground/Sky | 11 |
| Black | 00 |
| White | 01 |
| Sky | 10 |
This is a convenient setup, because we can just clear the viewport by filling it with 1s, then get any of the other colours by ANDing various bitmasks to it. The renderer never alters the same pixel twice, so we can always get any colour when we need it.
However, there’s no way to directly adapt this approach to the Apple II, since there’s no concept of palette lookup. In fact, we can’t even set pixel colours independently, since any bit we change affects its surroundings. What to do in this situation?
Plotting Pixels
When adapting the renderer to the Plus/4, I had to change the binary representation due to the fact that on the TED chip the 11 pattern is also fixed across the whole screen, and only the 01 and 10 patterns can be configured per block. Since white was also needed elsewhere on the screen, I assigned that to 11, and changed the ground to use the now free 01 pattern. This meant that the operations to plot pixels of various colours changed from a universal AND the following way:
| Colour | C64 | CPlus/4 |
|---|---|---|
| Ground/Sky | - | - |
| Black | AND 00 | AND 00 |
| White | AND 01 | OR 11 |
| Sky | AND 10 | XOR 11 |
You can probably see where this is going. By pure accident, I stumbled upon a scheme that would match the crazy Apple II system as perfectly as possible. If we make the very obvious choice of fixing the orange/blue palette for the 3D world and we start with a screen filled with orange, we get the following plotting operations:
| Colour | Bit Pattern (Even-Odd Bytes) | Operation Applied to Ground |
|---|---|---|
| Ground | 10101010 11010101 | - |
| Black | 10000000 10000000 | AND 10000000 10000000 |
| White | 11111111 11111111 | OR 01111111 01111111 |
| Sky | 11010101 10101010 | XOR 01111111 01111111 |
Of course things are a bit more involved when we want to deal with individual pixels, but it’s not as complicated as it first seems. Since two bytes cover exactly 7 whole colour cycles, I only needed to solve the problem locally, then the same pattern could be repeated to cover the whole width of the viewport.
From the perspective of the renderer, one colour cycle is equivalent to one multicolour pixel. It so happens that 126 is divisible by 7, so we only lose two of the original 128 pixel columns in the translation. I divided the viewport into 18 columns of 7 (wide) pixels, and set up the bitmasks to plot individual pixels in each colour:
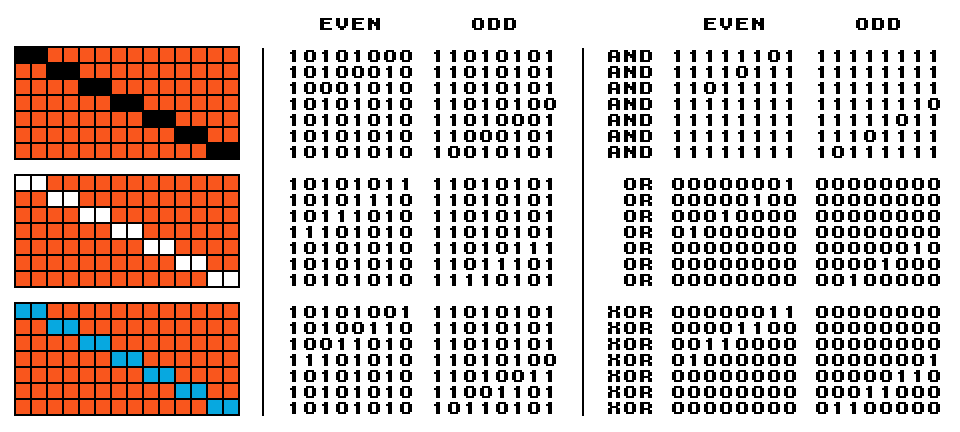
The diagram above shows the idealised outcome, the required bit pattern to approximate it as closely as possible, and the operation needed to transform an orange run into that pattern. But we can’t truly treat this as 126 independent pixels. Let’s see what happens when we write these values into the graphics memory and look at the raw, approximated and filtered outputs:
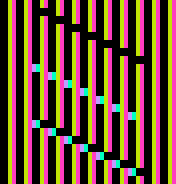 |
→ |  |
→ | 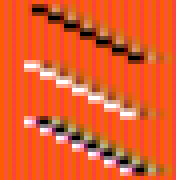 |
Due to the nature of how the dot patterns play out, the resulting wide black and white pixels are offset by a half cycle. This is the best we can do, but fortunately it’s not very noticeable when playing the game. It’s also obvious that we can’t put a single blue pixel in the middle of an orange run, since all it does is create a white-black ripple. Since we need to draw blue pixels in larger blocks, this is not really a problem.
Another thing worth noting is that the middle pixel out of the 7 is affected by both bytes: bit 6 of the first one and bit 0 of the second. However, we only need to change one of them: the first byte to make a white pixel, and the second to make a black pixel. This is fortunate, because it means that we don’t have to deal with special cases, just use different look-up tables when converting X positions into byte offsets and masks depending on the desired colour. Blue pixels are a different story, but we never need to plot those individually.
Filling the Sky
The basic idea behind Stunt Car Racer’s filled vector look is simple: draw the geometry with black and white lines on a screen pre-filled with the colour of the ground, then change all pixels above the highest ground point in each pixel column to the colour of the sky. The C64 original does this in batches of 4 pixel columns, i.e. one character block at a time. The input of this process is a buffer filled with the Y coordinates of the lowest points we want to recolour.
As mentioned above, the C64 works in character blocks: each block has 8 consecutive bytes of bitmap data, plus two more bytes (really only 1.5) to specify the colours assigned to each of the three configurable bit patterns. The game goes through each 4-pixel column and uses the 4 Y values to mask out the boundary between the ground and the sky starting from the bottom and going upwards. This is a monotonic process: as we go up one scanline, the number of blue pixels can only increase. As soon as the game hits a point where it’s plotting full sky bytes, it finishes filling the current block and uses palette changes for the rest of the full blocks above (in fact, this is even further optimised by keeping track of the palette diff between subsequent frames and not updating palette entries that didn’t change).
The process is very similar on the Apple II with two differences:
-
There are no character blocks, because each row is a contiguous block of 40 bytes in memory. This is a welcome change, because it makes the rendering logic a lot less complicated. We just look up the base address of the next row as we go upwards, and there’s no need to do a special step after every 8 rows.
-
There’s no palette. We actually have to fill all the bitmap data. There’s also no easy way to exploit the similarity between subsequent frames. We could perhaps make a list of points plotted instead of actually plotting them into the framebuffer, then we could avoid overdraw in the sky. However, this would require memory we simply don’t have.
As it turns out, I got somewhat lucky again. Clearing the screen is a big part of the processing time, and I had to make it as fast as possible. I ended up with a solution where I generate an unrolled loop to clear a whole column (leaving the first and last 16 rows of the screen intact, since they contain the frame):
FillColumn:
  sta Row143,x
  sta Row142,x
  sta Row141,x
  ...
  sta Row018,x
  sta Row017,x
  sta Row016,x
  rts
I can just set the A register with the byte value to fill the column with, and X with the byte offset of the column between 2 and 37. Also, this is not really just one subroutine but 128 different ones: by calling address FillColumn + N × 3 I can fill all except the last N rows of the column with the given byte. This routine is used both to fill the screen with orange in the beginning, and to fill the sky with blue as soon as we reach the point on the boundary where the next byte doesn’t have any ground pixels left.
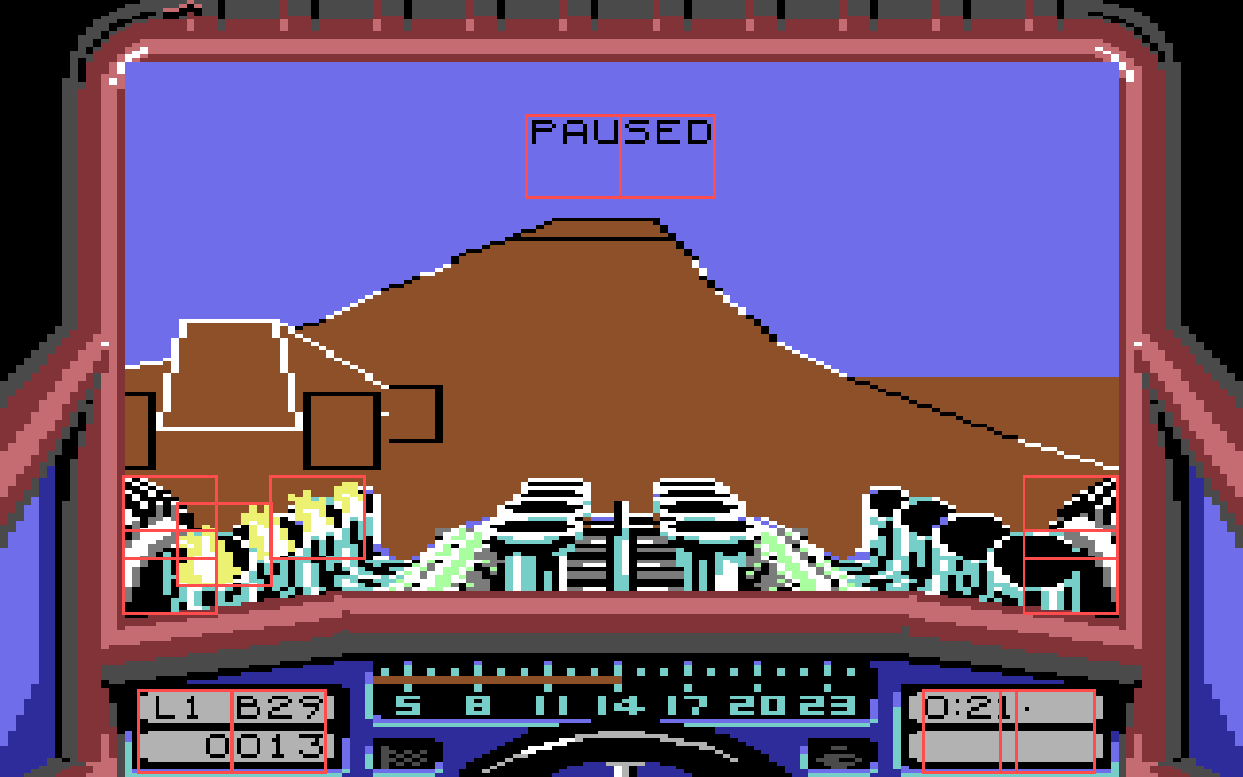
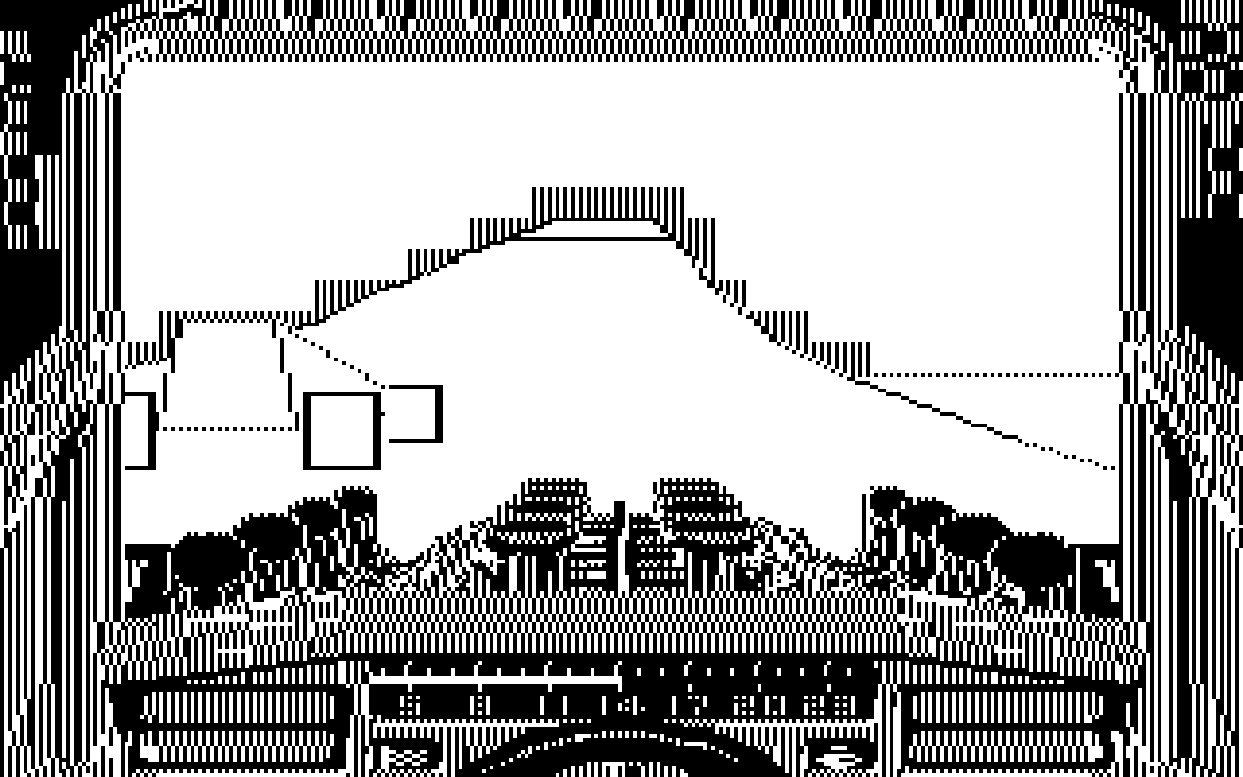
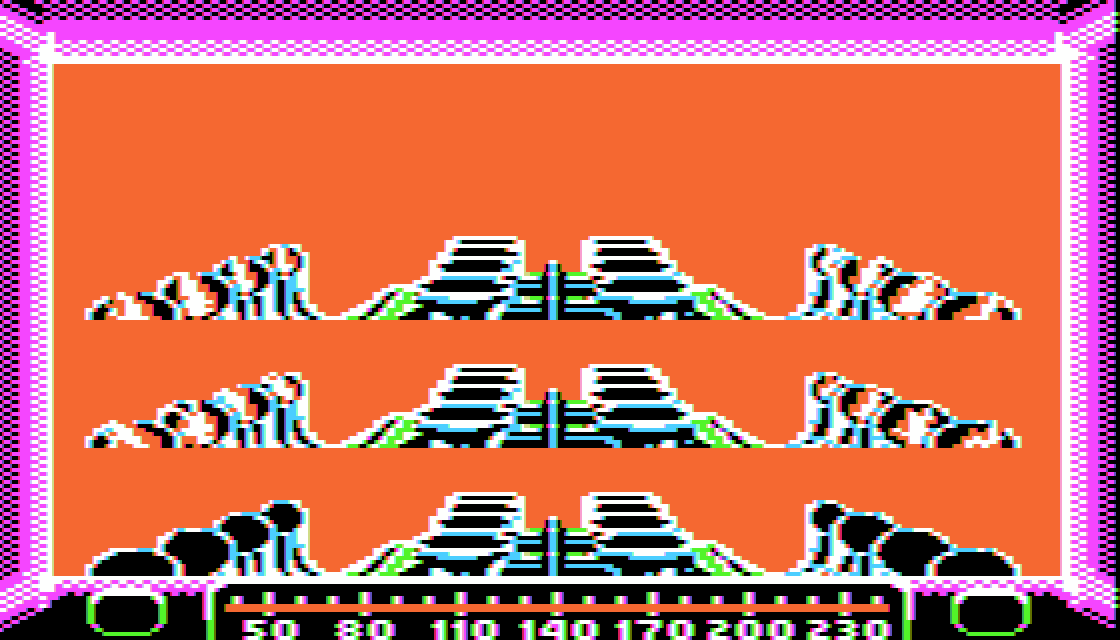
The sky fill routine loops over bytes, so it deals with 3.5 wide pixels at a time. While filling the boundary, it combines the necessary masks to XOR the buffer with depending on whether we’re in an even or an odd byte column (the leftmost one is even since we’re counting from 0). Here’s a screenshot of a final rendering along with its monochrome reference:
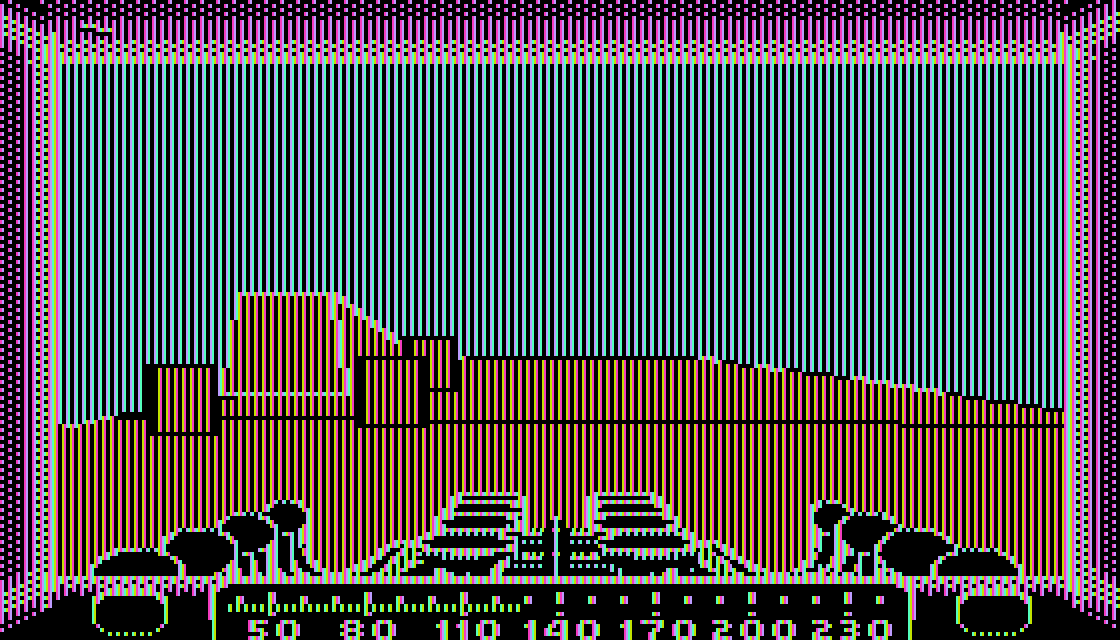 |
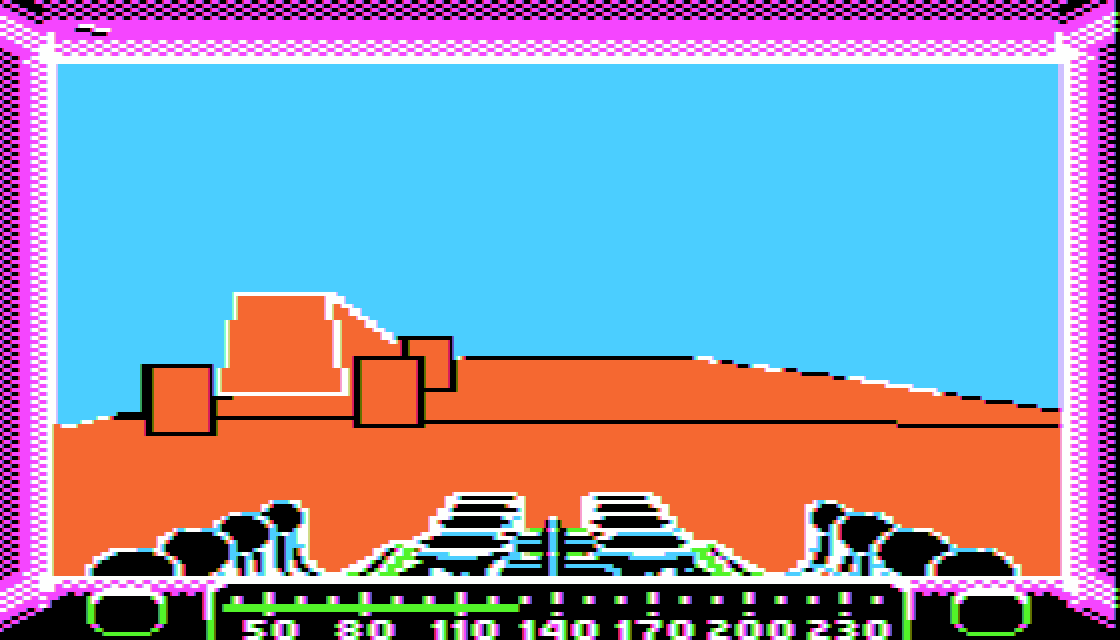 |
Drawing the Front of the Car
In the first iteration I didn’t even include the image of the car’s front, since I hadn’t made space for it yet in the memory. The C64 version simply stores the image of the car in an off-screen buffer, and just copies it over when the bottom part of the viewport is being cleared. I didn’t have this luxury because in the absence of hardware sprites I actually needed three versions of the picture: one with no flames and two with different frames of the flame animation.
Having gone through the Plus/4 port I had to solve this exact same problem already. In that case, I reduced the flame animations to diffs against the base image, so they would take up much less space in memory. I also implemented the logic that picks the correct image in the screen clearing process, which I could largely reuse for the Apple II version.
Even with this head start, there were a few issues to solve:
- Everything had to fit in 48K, which is 16K less than what we get on the Commodores.
- Clearing the screen had to be fast. We’re already losing a lot of time due to overdraw in the sky.
- The screen is cleared in columns instead of rows, and we have to draw the car in a way that can take advantage of this fact.
Let’s look at the gameplay image in the editor:
Just to get something on the screen, my first approach was to not have any kind of off-screen copy for the car. Instead, I used a variant of the sky filling logic to clear the pixels around the car’s silhouette to orange. This was extremely slow: clearing the screen went from 26.6K clock cycles to 43.1K. On the Apple II, each frame takes 17030 cycles, so this change alone made the game update cycle almost a whole frame slower. Also, at this point I didn’t have the flames implemented, as I was still looking for more memory.
I ended up with a solution that breaks down the image byte by byte depending on its dynamics in-game:

The black bytes are filled with orange using the column fill routine with precalculated offsets. The blue bytes are completely static, they never change, therefore they only need to live in the framebuffer. The purple bytes are the ones that show part car, part world, and need to be reset to the same value in every frame. The orange bytes are the ones affected by the flames, and their value needs to change whenever the player starts or stops boosting (the animation frames are allocated statically to the two video buffers, so once drawn they alternate automatically between subsequent frames). The green bytes are both on the edge and affected by the flames, so we need to make sure to pick the correct values when resetting the buffer.
All the extra data including pointers ended up taking just over 800 bytes, and the final screen clear routine is only about 1.7K clock cycles slower than the one with no car image, which is basically unnoticeable. All the classification of bytes, determining the Y values of the car’s highest pixels and the building of the necessary tables is implemented as KickAssembler macros using only the above image as input, so any changes in the artwork are automatically propagated with every build.
The 128×384 Sudoku Board
So far I talked about modelling artifact colours and the bit patterns required to plot pixels of various colours, and now it’s time to reveal another peculiar aspect of the Apple II: non-linear addressing. While each line of text and graphics is contiguous in memory (40 bytes in both cases), the addresses of the rows are all over the place. The reason for this was to simplify the necessary circuitry and save costs, but it’s beyond the scope of this article to go into details. What matters here is the ramifications for the porting effort.
The memory areas for both text and graphics are fixed, and both have a low and a high range, respectively, which allows for easy double buffering. The two text screens start at $400 and $800 and take up 1K each, while the graphics screens are 8K blocks at $2000 and $4000.
In text and low-res graphics mode the 6-bit Y values (between 0 and 23) are translated into a 10-bit offset, which is added to the active base address of $400 or $800. For high-res graphics mode the idea is similar, but we map an 8-bit value (between 0 and 191) into a 13-bit offset (for those unfamiliar with 6502 assembly, $ denotes hexadecimal and % denotes binary numbers):
    TextY = %00BBBAAA  →      TextRowOffset = %AAA0000000 + %BBB × 40
GraphicsY = %CCBBBAAA  →  GraphicsRowOffset = %AAABBB0000000 + %CC × 40
For instance, this is the true face of the above assembly snippet for clearing a column:
FillColumn:
  sta $3cd0,x // row 143
  sta $38d0,x // row 142
  sta $34d0,x // row 141
  ...
  sta $2900,x // row 18
  sta $2500,x // row 17
  sta $2100,x // row 16
  rts
All this scrambling wouldn’t really matter if memory wasn’t too tight, since we need to build a table of row addresses anyway if we want fast drawing routines. The reason this makes life more complicated is that we’re using the split screen mode in the game. We’re only showing the first 160 rows of the high-res graphics screen, and the last 4 rows of the text screen. The way double buffering is implemented forces us to switch them at the same time, i.e. we’re either showing the $2000/$400 or the $4000/$800 pair of screens. This means that we need to maintain a copy of the HUD in the last 4 lines of both text screens, and also the full car frame needs to be present in both graphics screens.
Using the split screen mode not only makes it much faster to update the HUD on the bottom, but it also frees up a lot of memory: 2560 bytes of bitmap space for the 64 unused rows across the two screens. The problem is that this is not a contiguous area, but 64 disconnected 48-byte regions. The reason they are 48 bytes instead of 40 is that they happen to be followed by so-called screen holes caused by the addressing scheme, which leaves the last 8 bytes of every 128 bytes unused.
Let’s see the full memory layout used during gameplay, every single one of the 49152 bytes of RAM:
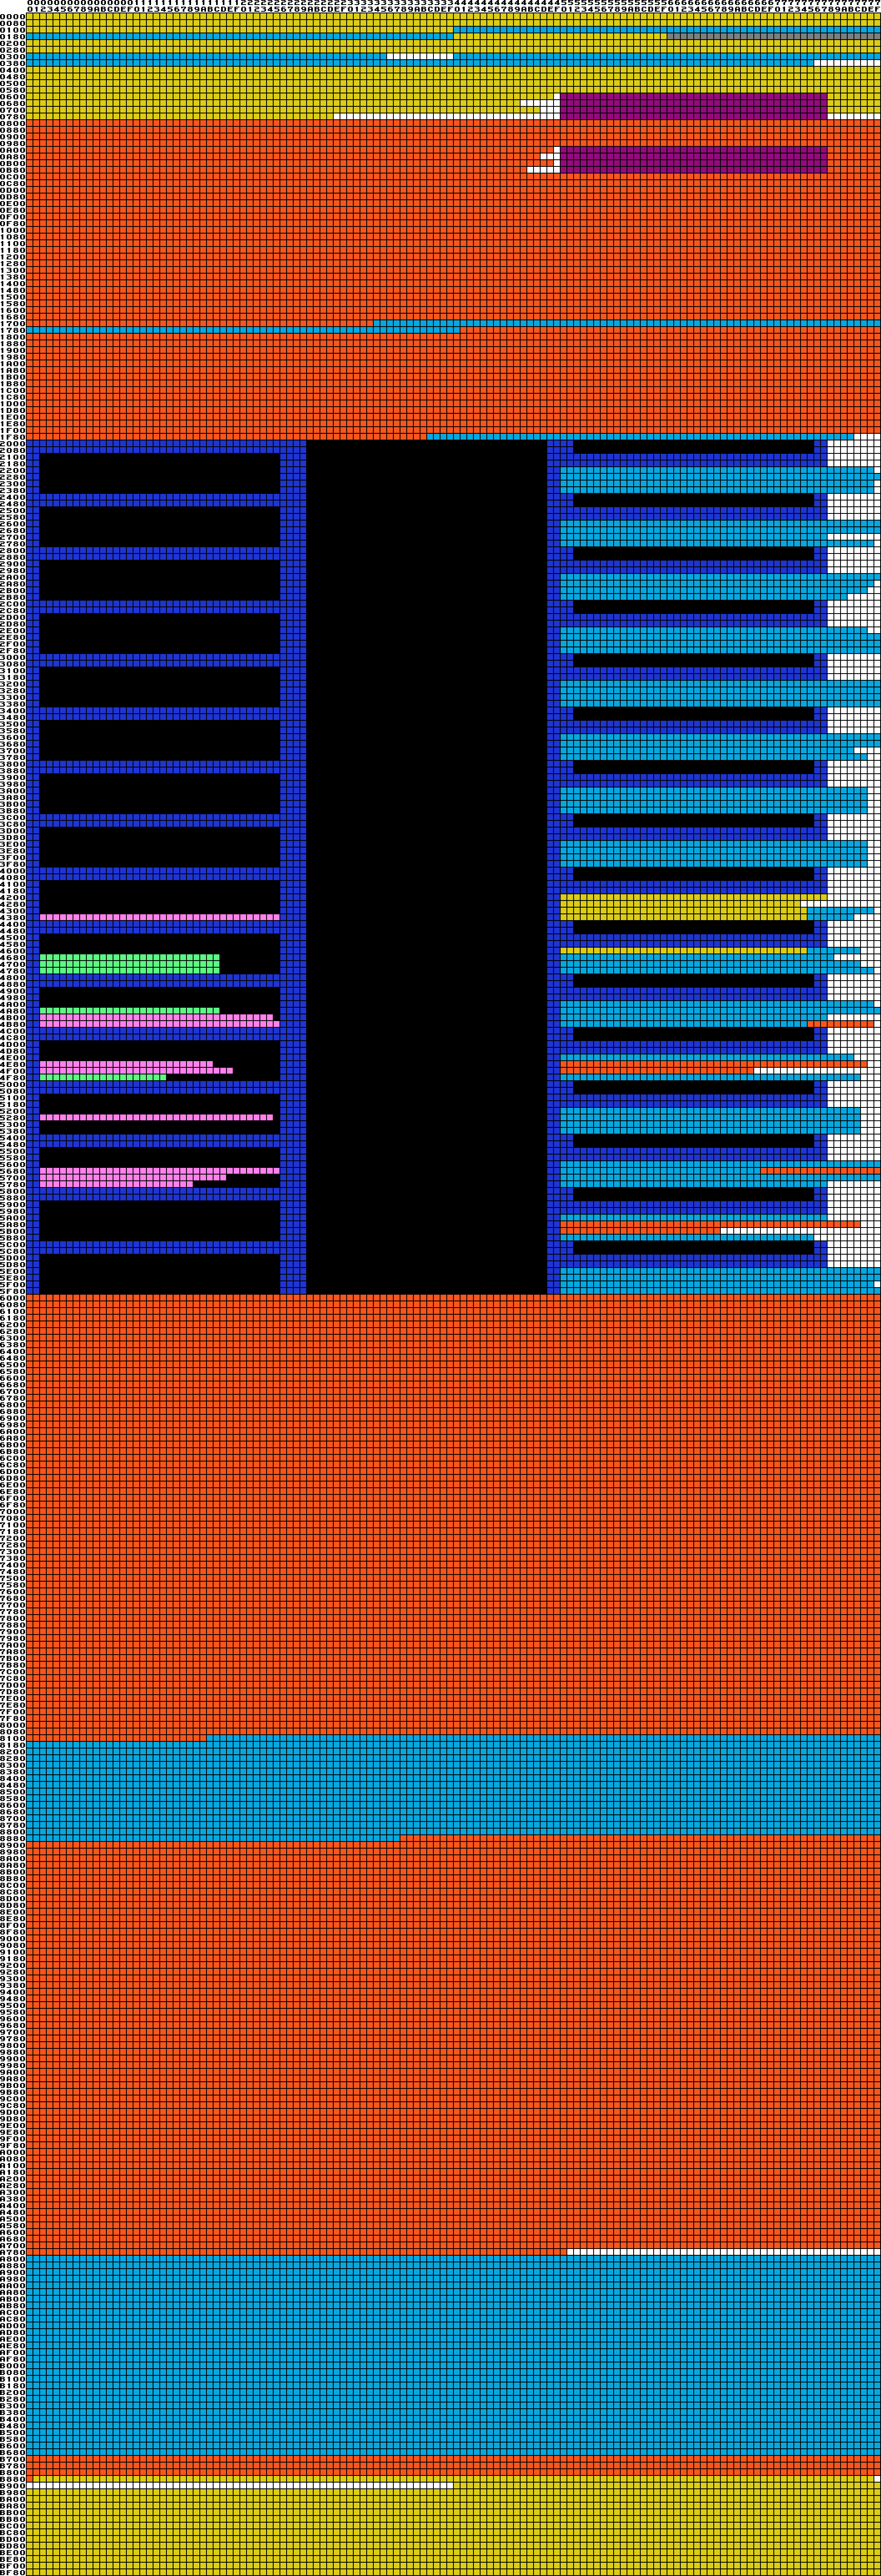
| ■ Free memory ■ Code ■ Stack ■ Variable ■ Static data |
■ Graphics (car frame and indicators) ■ Viewport (showing the 3D world) ■ Text (HUD) ■ Boot code (destroyed during the first race) ■ Boot data (destroyed during the first race) |
The loader system I’m using, c2d, uses the memory region above $b700 during the loading process. At startup, the title screen is at $2000, and as soon as we proceed it gets overwritten by a copy of the graphics from the other screen. The code and data used during this process is carefully placed in the viewport area of the second screen. This is also when the column fill code – the last orange stretch after the data region – is generated at $b700. You can see how the code flows around the last four lines of the second text screen, as the program starts at $800. Outside gameplay, the entire first text screen ($400-$7ff) is used for the menu, and the HUD text survives only in the second screen during this time. Most of the 48-byte holes are filled with either the Y coordinates of the track elements or the various strings that make up the menu screens, because these are small pieces of data that didn’t need to live in big contiguous areas.
To be able to conveniently pack everything and keep track of the available space, I created this simple KickAssembler macro:
.macro SetAddress(address) {
  .var last = *
  .var gap = address - last
  .if (gap > 0) {
    .fill gap, $00
    .print "Free $" + toHexString(last, 4) + "-$" + toHexString(address, 4) + ": " + gap
  }
}
For example, the first 48-byte screen hole is defined like this:
* = $2250

<content>

SetAddress($2280)
If the content between the two addresses is less than 48 bytes, it gets padded to fill the hole, and I get a printout with the address and the remaining space. If it’s more, then the build fails and tells me where the overflow was.
Another recurring need was to align certain data structures to specific offsets within pages to minimise page crossings in indexing operations, since those make each access take an extra clock cycle. The macro below achieves this and also reports any free memory left in the process, which allowed me to organise tables so they are tightly packed and still efficient to access.
.macro AlignPage(offset) {
  .var current = *
  .if ((current & $ff) <= offset) {
    SetAddress((current & $ff00) | offset)
  } else {
    SetAddress(((current + $100) & $ff00) | offset)
  }
}
While there are 897 unused bytes altogether, almost half of them (399, to be precise) are tied up in the holes of the graphics screens, fragmented into mostly 8-byte regions. There are only 112 bytes left in the last two free contiguous regions near the end of the RAM. If we wanted to make space for more features, I’d start by moving the variables in the big holes (the yellow bytes right after $4000) into the unused small ones, and moving more code into the big holes instead. But even then it’s going to be challenging to add any kind of substantial feature at this point.
Breaking the Silence
Speaking of features, one aspect of the game that’s almost completely lost is sound. This is not just due to the memory pressure, but also the fact that the Apple II has the most primitive audio capabilities of all computers. All you can do is trigger an edge (which by itself sounds like a pop) manually whenever you need it. Even just to get a beep, you have to write a loop and trigger edges at regular intervals programmatically. The machine has no timers or interrupts of any kind, at least not without involving hardware extensions like the Mockingboard. But even without extra hardware the Apple II can generate surprisingly rich sounds if you can dedicate 100% CPU time to that task only. Of course this was out of the question in my case.
The most important aspect of the game that requires feedback is receiving damage, so I decided to have two different sound cues. Whenever the car receives a small amount of damage and the crack advances on the frame, we hear a pop, which does sound a bit like something cracking. When there’s a powerful collision that results in a new hole, we get a beep. However, since I didn’t want to waste time idling just to make a beeping sound, I went for a little trick. If there’s a fresh hole from the previous frame, I generate an edge for each column in the screen clearing and the sky drawing subroutines. This way there’s no need for an idle wait betwen edges, and we get a distinctive sound without using almost any time.
Tooling Woes
One surprising issue I ran into was the lack of drawing applications that target specifically high-res graphics mode, as opposed to e.g. double high-res, which is only available on later models. I was extremely not interested in using a program inside the Apple II emulator, and even these native offerings seemed very limited anyway based on a cursory look. While searching for solutions, I stumbled upon Outlaw Editor, which is the art tool used in the development of Lawless Legends. This is one of the best-looking games for the platform, and I had high hopes for their tooling.
The editor is a complete asset management system with support for tilemaps and scripting besides drawing bitmaps. It’s also a rather fiddly and sometimes awkward Java application that’s not so comfortable to use by others than its creators. Still, I’m grateful they released it, because it allowed me to create the first version of the in-game graphics: the frame of the car with the speed gauge and indicator lights.
Unfortunately, there’s no easy way to import images into this editor, and I needed to work on the image of the car’s front as well as the title screen. At this point I decided to just roll my own drawing solution specifically designed to touch up existing pictures. There are some quite good conversion tools available, and I settled for ][-Pix, which seemed to offer the best quality and had support for high-res graphics. I whipped up a tiny paint application in HTML and Javascript which could import and export images in the binary form produced by the converter (i.e. laid out to be directly loaded into the Apple II’s graphics memory), and it would allow easy pixeling with the colour constraints.
Closing Words
This was a very enjoyable experience overall! While the Apple II is quirky in many ways, I have no trouble accepting these rough edges as products of its era. All 8-bit micros, even those that came out much later, have their own set of idiosyncrasies. This was a very powerful architecture for 1977, and its weakest point was its lack of meaningful support for audio. However, it was also designed to be extensible, so at least there was a way to get around the limitations.
What surprised me a bit was the rather toned down reception this release got, especially compared to the Plus/4 version. This is quite interesting, since the Apple II was a much more successful platform with an enormous install base, while the Plus/4 was basically a failed experiment – even if it got a second life in Eastern Europe. It’s curious how little the modern homebrew scene can reflect the popularity of platforms in their heyday. It seems to me that both the Apple II and the MSX family are quite underrepresented compared to their importance in computing history, and I’m not sure why. Personally, I find all of these machines quite fun to develop for with the power of modern tooling.
In any case, I hope Stunt Car Racer finds its audience on the Apple II eventually. No matter what, I’m happy I jumped into this venture, because it opened up a new world for me.